
Are you looking to get started with Python REST APIs but feeling overwhelmed by the technical jargon?
Don't worry! This beginner's guide will introduce you to the basics of REST APIs and show you five simple Python examples you can start using immediately. Learn how to get up and running with Python and REST APIs - no prior knowledge is needed!
Whether you're new to Python or an experienced developer, this guide will give you the tools you need to start working with REST APIs in Python with confidence. Let's get started!
What is a REST API?

REST API (Representational State Transfer API) is an application programming interface (API) that allows developers to access and manipulate data over the internet. They are an essential part of modern web development and facilitate communication between different applications, websites, and services.
At its core, a REST API is a set of rules and guidelines that describe how web services and applications should interact. This allows developers to create APIs that are designed to work with a variety of different applications, platforms, and services. When a developer creates an API, they must follow the requirements of a REST API.
REST APIs use the HTTP protocol to communicate between applications. This means that developers can use the same methods for accessing and manipulating data regardless of their platform or service.
This makes it much easier to integrate different services and applications, and it allows developers to quickly and easily access and manipulate data.
REST APIs are based on a set of principles, including:
- Separation of concerns: A developer should separate an application's data, logic, and presentation layers. This makes it easier to maintain and update the application.
- Statelessness: Each request from a client should contain all the information necessary for the server to process it. This allows the server to respond quickly and reliably.
- Caching: Caching allows the server to store responses for future requests, reducing the load on the server.
- Layered system: A layered system allows developers to create APIs built on top of existing ones. This will enable developers to focus on developing the components that are specific to their application.
- Code on demand: This allows developers to add code to an application that can be executed at run time.
These principles ensure that REST APIs are easy to use and maintain and are designed to make it easier for developers to create and integrate applications.
REST APIs are essential to modern web development and are becoming increasingly popular among developers. By following the principles of a REST API, developers can create reliable, scalable, and secure APIs.
1) HTTP Methods
HTTP methods are the verbs used to initiate a request. They are also known as request types. The four main python HTTP API methods are GET, POST, PUT and DELETE.
The GET method is used to retrieve information from the server. It is the most commonly used method to get a list of objects or a single object.
The POST method is used to send data to the server. This could be a file, image or form. It is used to create a new object or update an existing object.
The PUT method is used to update an existing object on the server. It is the opposite of the POST method in that it will replace a current object instead of creating a new one.
The DELETE method is used to delete an object from the server. This method is used to remove an object from the server permanently.
2) Status Codes
Status codes are returned with each response from the server. These codes indicate whether or not the request was successful.
The most common codes are 200 OK, 201 Created, 400 Bad Request, 401 Unauthorized, 403 Forbidden, 404 Not Found, 500 Internal Server Error and 503 Service Unavailable.
- The 200 OK code indicates that the request was successful and the requested information was returned.
- The 201 Created code indicates that a new object was created on the server.
- The 400 Bad Request code indicates that the server could not understand the request.
- The 401 Unauthorized code indicates that the user cannot access the requested information.
- The 403 Forbidden code indicates that the user cannot access the requested information.
- The 404 Not Found code indicates that the requested resource was not found on the server.
- The 500 Internal Server Error code indicates that there was an error on the server, and the request could not be processed.
- The 503 Service Unavailable code indicates that the server is temporarily unable to process the request.
3) API Endpoints
API endpoints are the URL paths to the resources being requested from the server. These endpoints are specified in the request and used to determine the resource the request is targeting.
For example, a request to "https://www.example.com/api/v1/users" would target the users' resources. The endpoint for this request would be "/API/v1/users".
API endpoints are essential because they tell the server which resource to retrieve or update. If the wrong endpoint is specified, the server may not be able to process the request.
REST API is a web-based architecture based on the well-known HTTP protocol. It uses HTTP methods, status codes and API endpoints to request and receive responses from a web server. Understanding these components is essential for building and using successful REST APIs.
What is Python?
Python is a powerful, high-level, general-purpose programming language. It is a universal language used for various applications, from web development and software engineering to data science and machine learning.
It was first released in 1991 by its creator, Guido van Rossum. Since then, it has become one of the most popular programming languages in the world. Its popularity is partly due to its ease of use, flexibility, and scalability.
Python is an interpreted language that runs on any platform with an interpreter installed, such as Windows, Mac, or Linux.
Python code is easy to read and understand, making it an ideal choice for beginners. Python also has an extensive library of built-in functions and modules, which can be used to create complex applications quickly.
It is an object-oriented language, meaning that it is based on the concept of objects and classes. This allows developers to create robust and reusable code that can be used repeatedly.
It has become the language of choice for many developers due to its versatility and ease of use. It can be used to develop web applications, machine learning algorithms, data science applications, and much more.
It is known for its scalability and performance. It is often used to develop applications requiring large amounts of data, complex calculations, or data processing.
Python is an excellent choice for anyone interested in learning to code or developing applications. It's an easy language to learn, and the large library of modules and functions makes it easy to create powerful applications quickly.
Benefits of using Python
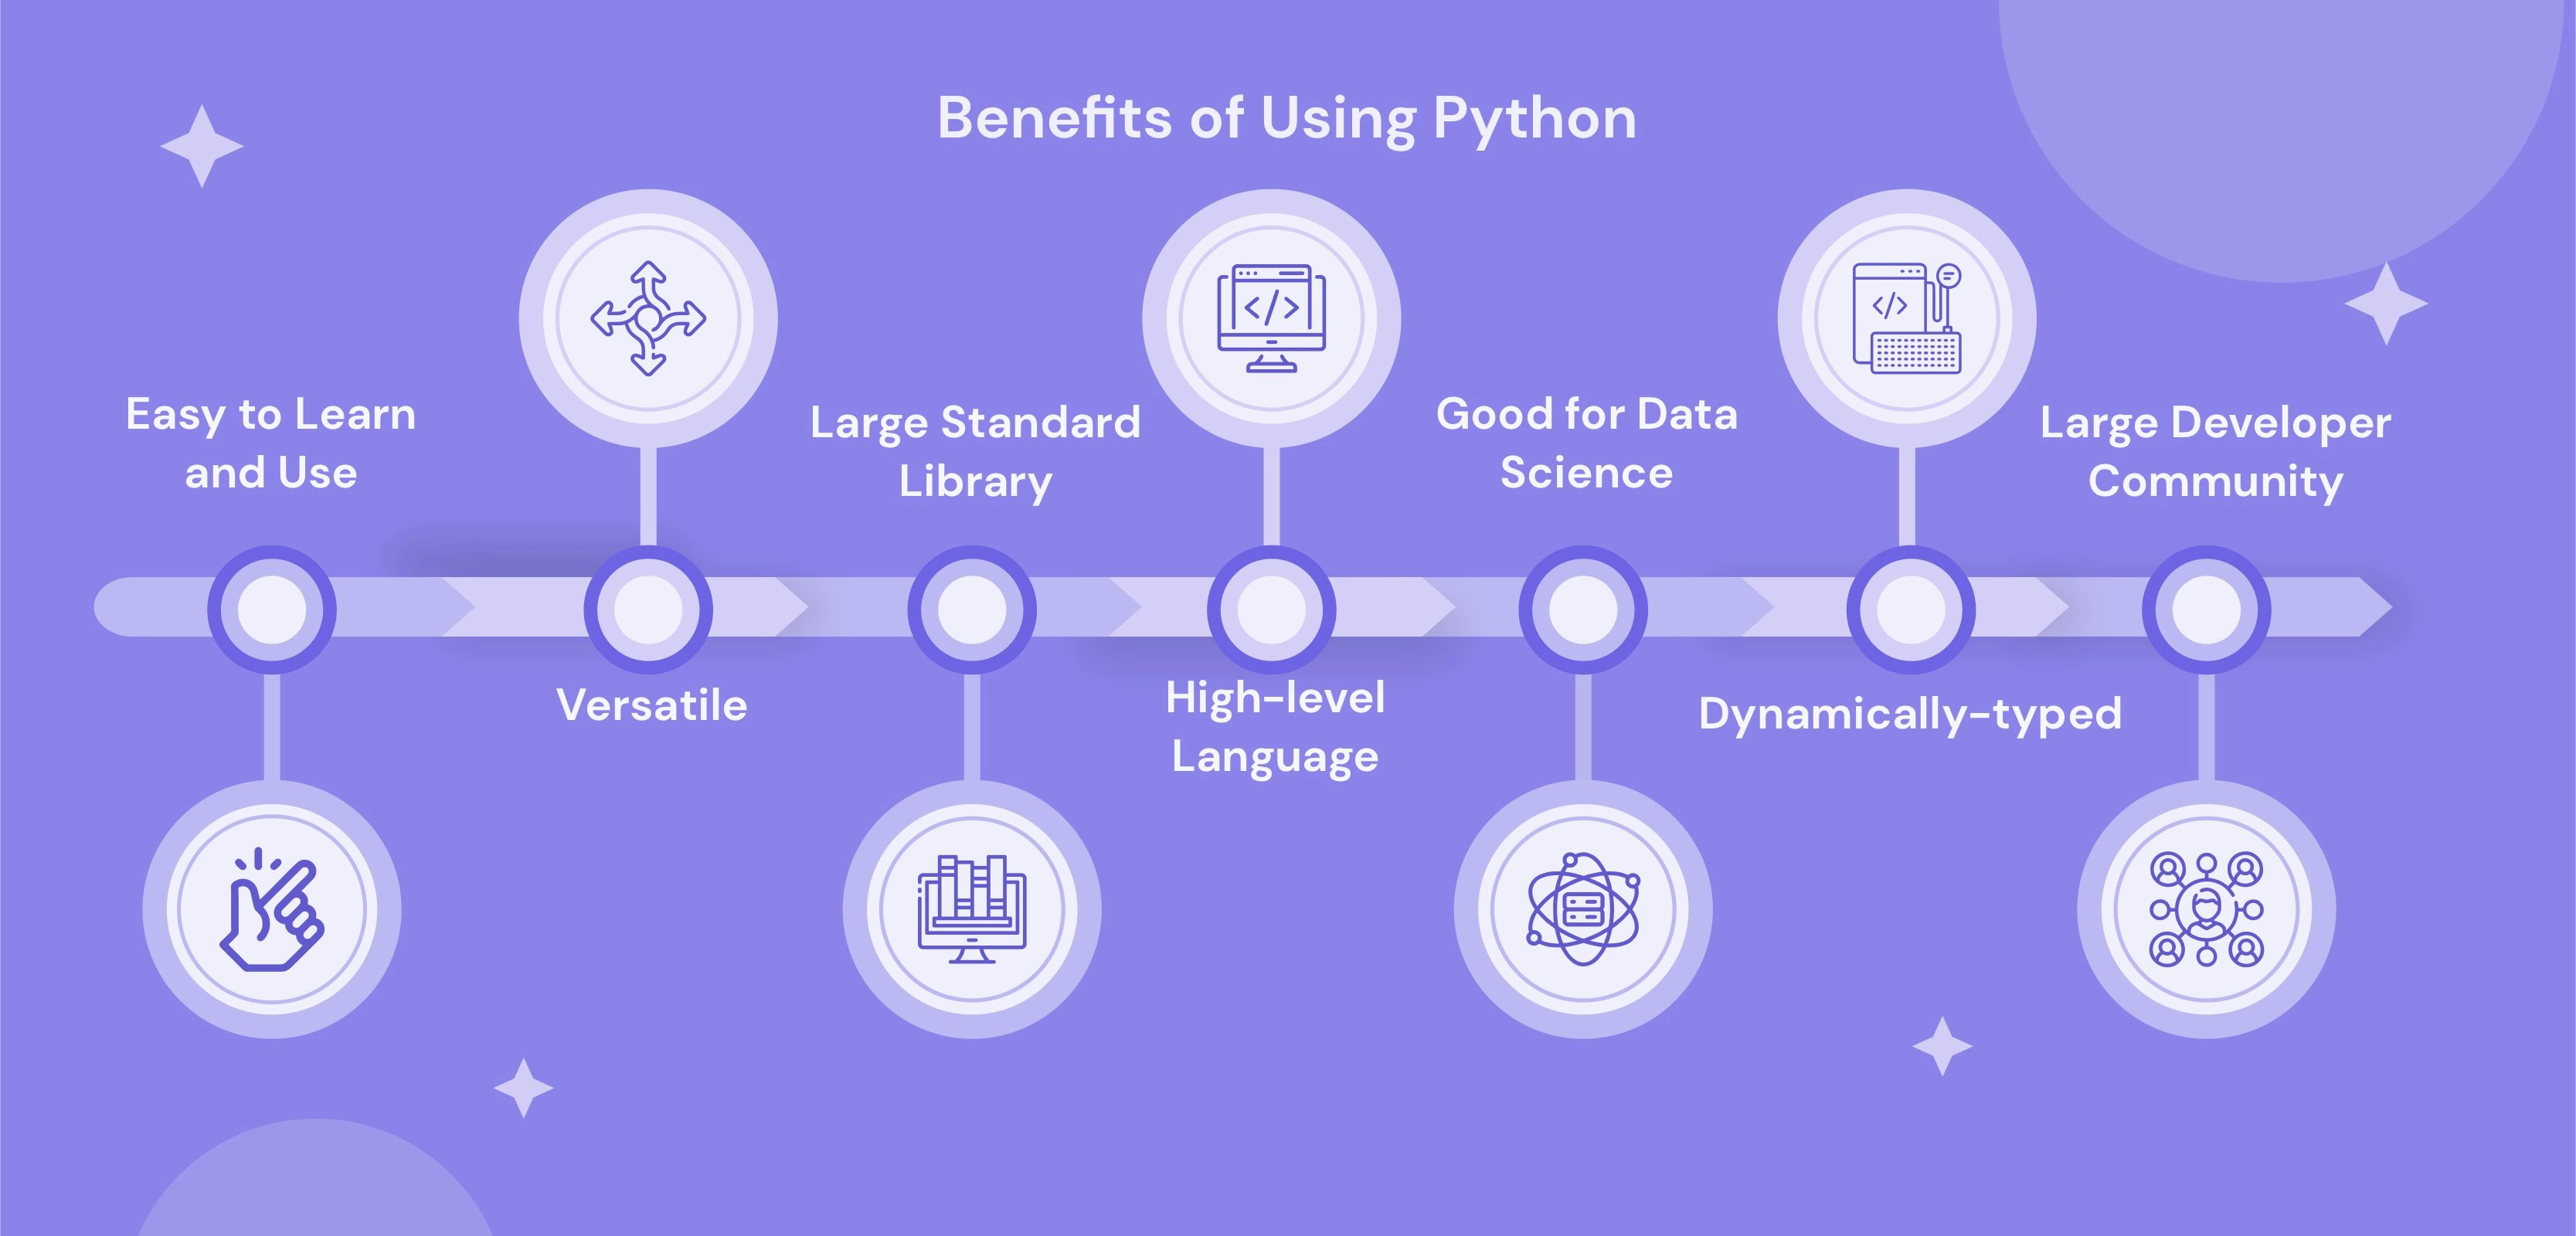
There are many benefits to using Python for software development:
1. Easy to learn and use
It has a simple syntax and a large, active community of developers, which makes it easy to learn and use.
2. Versatile
It is a general-purpose programming language used to build almost anything. Python has the tools and libraries to help you get the job done, from web applications to scientific simulations.
3. Large standard library
It has an extensive standard library that includes modules for many everyday programming tasks, such as connecting to web servers, reading and writing files, and working with data. This means you don't have to reinvent the wheel every time you start a new project.
4. Many third-party libraries
In addition to the standard library, thousands of third-party libraries are available for Python, making it easy to find a library that fits your specific needs.
5. High-level language
It is a high-level language, meaning it abstracts away many details of computer hardware and operating systems. This makes it easier to write and maintain complex programs.
6. Good for data science
It has several powerful libraries for data analysis and visualisation, such as NumPy, Pandas, and Matplotlib, which makes it a popular choice for data science and machine learning.
7. Strong support for object-oriented programming
It is a fully object-oriented language which supports all the features you would expect in an object-oriented language, such as inheritance, polymorphism, and encapsulation.
8. Dynamically-typed
It is a dynamically-typed language, meaning you don't have to specify the variable type when you declare it. This can do writing and maintaining code easier, especially in large projects.
9. Great for prototyping
Its simplicity and flexibility make it an excellent language for prototyping new ideas. You can quickly write and test code and iterate on your designs without getting bogged down in details.
10. Large developer community
It has a large, active developer community, which means there is a wealth of online resources available for learning the language and a large pool of experienced developers to help you out if you get stuck. This makes it easy to get help when needed and stay up-to-date with the latest developments in the Python ecosystem.
Overall, Python is a powerful, easy-to-use programming language that is well-suited to various tasks, from web development to data analysis.
Python REST APIs: Consuming APIs and Requests
Consuming APIs and making requests with Python is relatively straightforward, thanks to the wide range of libraries available.
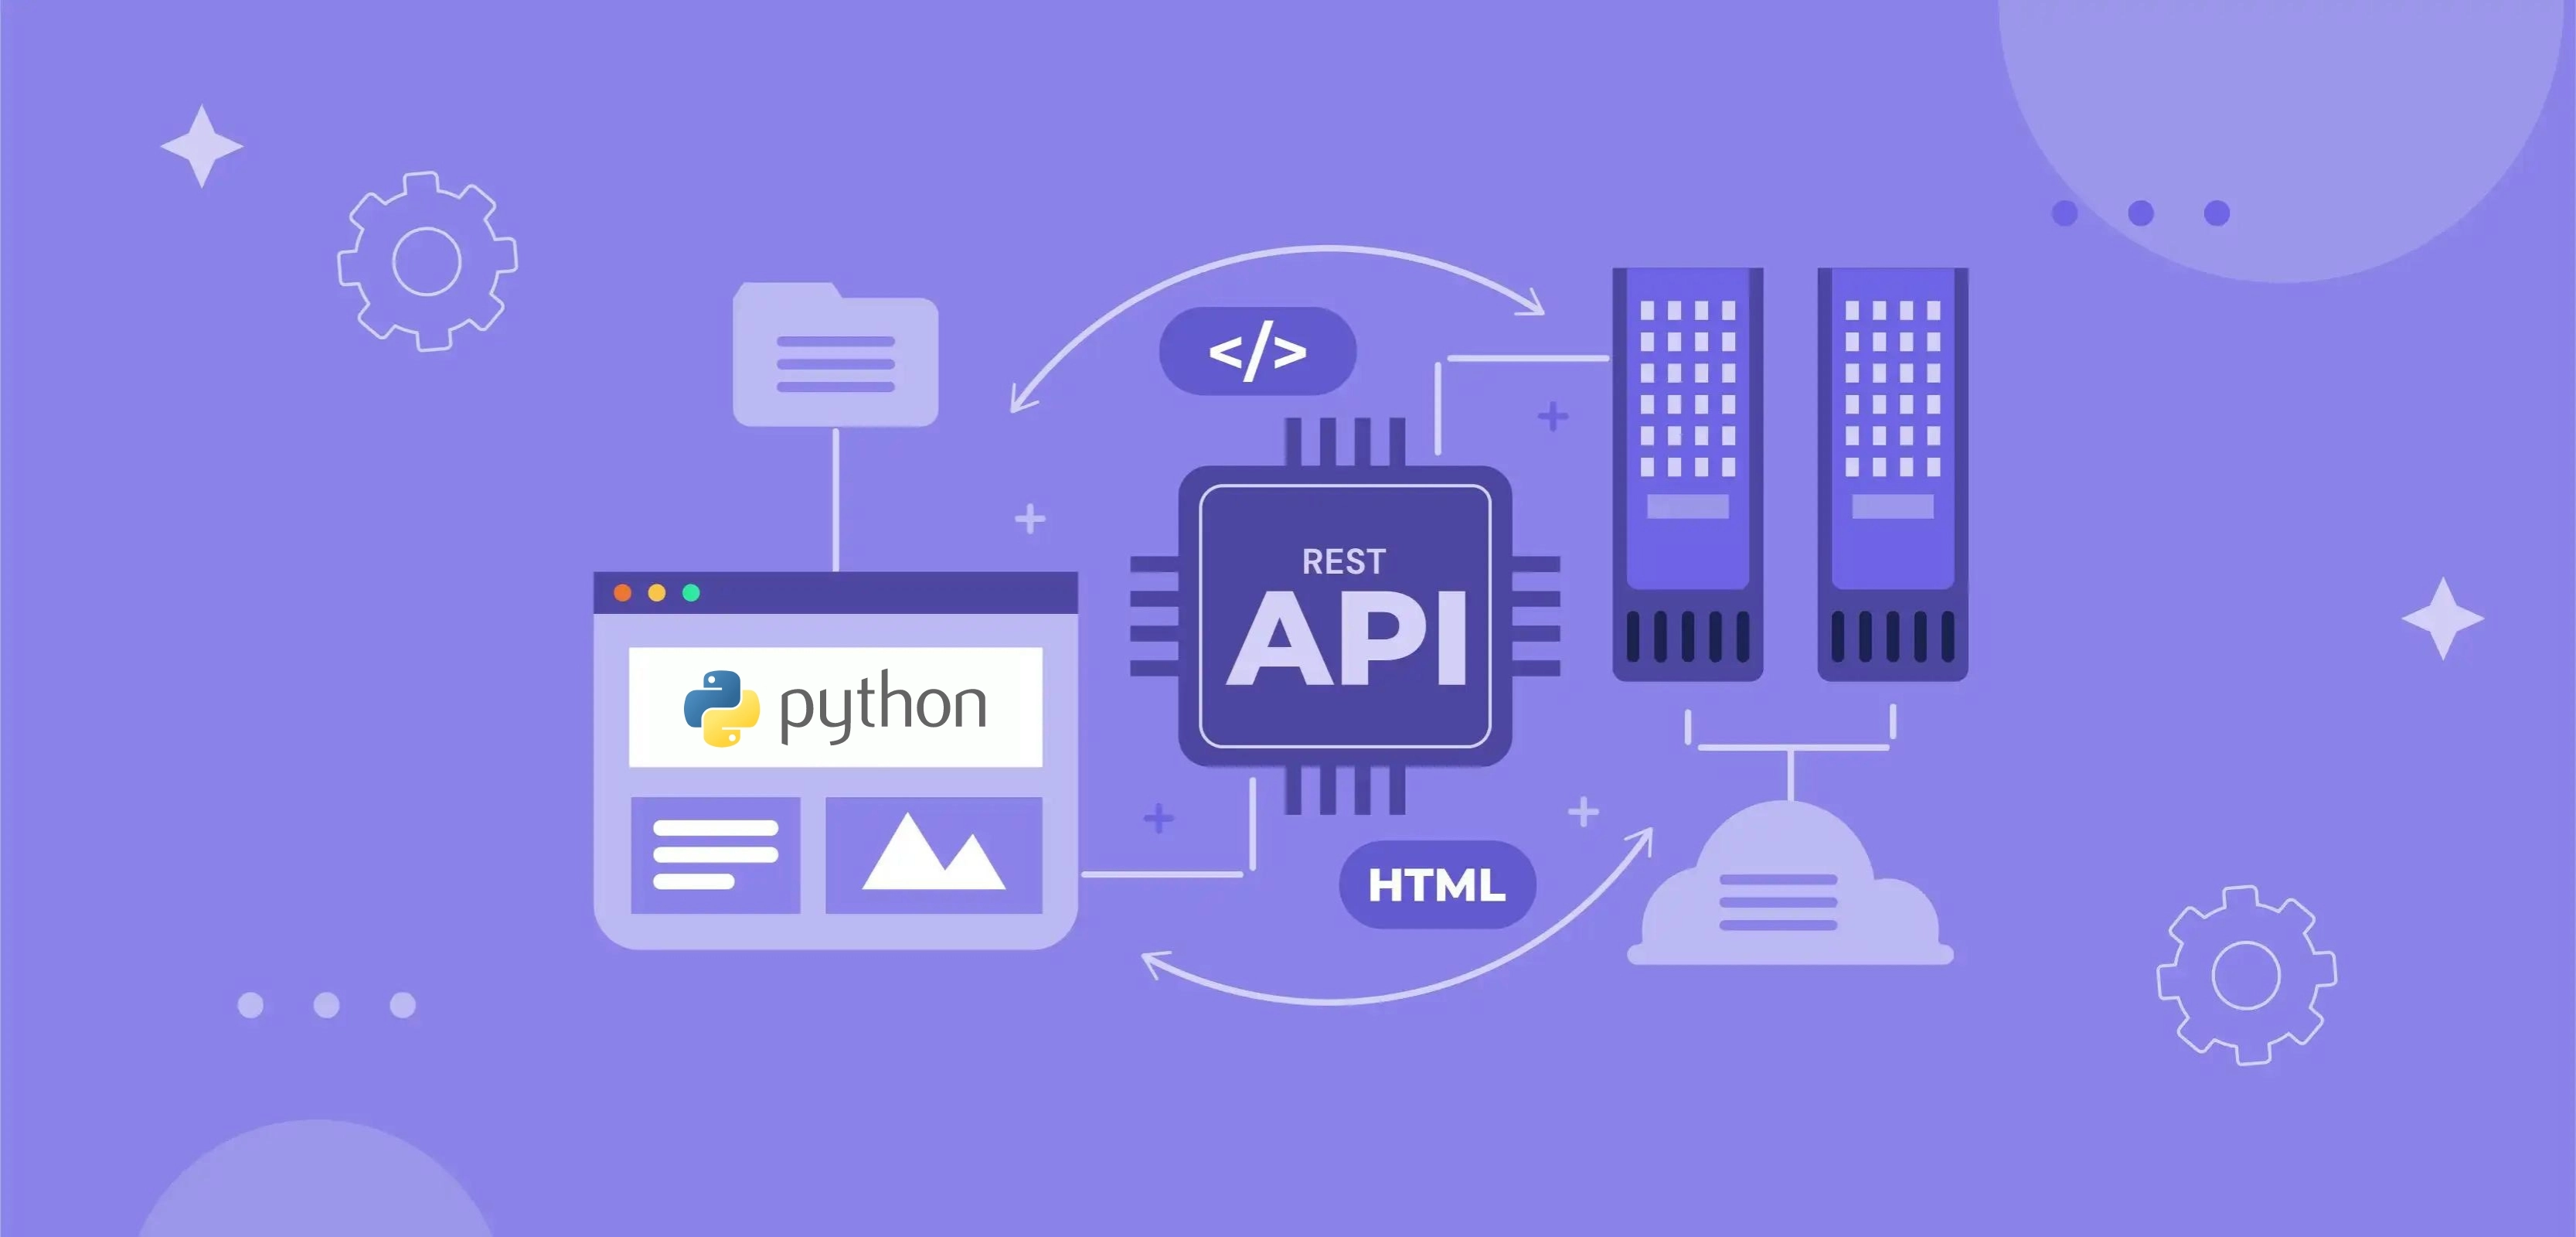
To consume a rest api python, you will typically need to send an HTTP request to the API's server and process the response you receive. There are several libraries available in Python that can help you with this, such as httplib, httplib2, and treq.
The most popular library for making HTTP requests in Python is the requests library, which provides a simple, easy-to-use interface for sending HTTP requests and processing responses. To install the requests library, you can use pip:
Pip Install Requests:
Once you have the requests library installed, you can use it to make HTTP requests like this:
{{python1="/components"}}
This will send a GET request to the specified endpoint and print the status code and the response text. You can also use the requests library to send POST, PUT, and DELETE requests and send requests with custom headers, cookies, and other options.
These libraries may be helpful in specific situations, but the requests library is generally the most convenient and easiest to use.
1) GET
GET is an HTTP method used to retrieve resources from a server. When you make a GET request to a server, you ask the server to return a specific resource.
To make a GET request in Python, you can use the requests library like this:
{{python2="/components"}}
The status code of the response will indicate whether the request was successful or not. A status code of 200 means that the request was successful, while a status code of 4xx or 5xx indicates an error.
The response text is the data the server returned in response to the request. This could be HTML, XML, JSON, or any other format the server supports.
The response headers contain additional information about the response, such as the content type, length, and metadata.
To customise the request, you can also pass additional parameters and headers to the get() function.
For example, to send query parameters, you can pass a dictionary as the params argument:
{{python3="/components"}}
The GET method is one of the most commonly used HTTP methods to retrieve resources from a server.
This is a simple rest api python example.
2) POST
POST is an HTTP method that sends data to a server to create a new resource. When you make a POST request to a server, you ask the server to accept the data you are sending and create a new resource.
To make a POST request in Python, you can use the requests library like this:
{{python4="/components"}}
The status code of the response will indicate whether the request was successful or not. A status code of 201 Created means that the request was successful and a new resource was created, while a status code of 4xx or 5xx indicates an error.
The POST method creates new resources on the server by sending data to the server. It is one of the most commonly used HTTP methods, along with GET and PUT.
3) DELETE
DELETE is an HTTP method used to delete resources from a server. When you make a DELETE request to a server, you ask the server to delete the specified resource.
To make a DELETE request in Python, you can use the requests library like this:
{{python5="/components"}}
This will send a DELETE request to the specified endpoint and store the response in the response variable.
The status code of the response will indicate whether the request was successful or not. A status code of 200 OK or 204 No Content means that the request was successful and the resource was deleted, while a status code of 4xx or 5xx indicates an error.
The DELETE method is used to delete resources from a server. It is one of the less commonly used HTTP methods but is still an essential part of many REST APIs.
4) PUT
PUT is an HTTP method that updates resources on a server. When you make a PUT request to a server, you ask the server to update the specified resource with the data you send.
To make a PUT request in Python, you can use the requests library like this:
{{python52="/components"}}
This will send a PUT request to the specified endpoint with the data specified in the data argument.
The PUT method is used to update resources on a server. It is one of the more commonly used HTTP methods, along with GET and POST, and is often used to update existing resources with new data.
One important thing to note about the PUT method is that it is idempotent, which means that multiple identical requests will have the same effect as a single request.
In other words, if you make multiple PUT requests to the same endpoint with the same data, the resource will end up in the same state as if you had made a single request. This is in contrast to the POST method, which is not idempotent and can have different effects each time it is called.
When making PUT requests, it is crucial to ensure that you send the complete, updated representation of the resource rather than just partial updates. This allows the server to update the resource and maintain consistency correctly.
The PUT method is a powerful tool for updating resources on a server and is an integral part of many REST APIs.
5) PATCH
The Patch REST API is a powerful tool for creating, reading, updating, and deleting data from a web-based API. It is a convenient way to access the data from a web application and use it in Python.
One of the most common uses of the Patch REST API is to create a web service that allows users to access data from a web application in a language they are comfortable with.
To make a PATCH request in Python, you can use the requests library like this:
{{python53="/components"}}
To begin using the Patch REST API, you must create a web service. This web service will be responsible for handling requests from the client, validating them, and then sending back a response with the appropriate data.
Once the web service is created, you can use the Patch REST API to access the web service and make requests.
The syntax of the Patch REST API is straightforward. The basic syntax of the Patch request is as follows:
patch({url}, {query_string_parameters}, {data})
The URL is the location of the web service. The query_string_parameters are the parameters sent along with the request to the web service. Finally, the data is the data that will be sent in the request.
The response from the web service will be returned in the form of a JSON object. This object will contain the data that was requested, and it will also include a status code indicating the success or failure of the request.
Once the response is received, you can then use the data in response to manipulate the data and create the desired results. For example, you may want to use the data to create a report or graph.
patch REST API can be used to create powerful applications and web services that allow users to access and manipulate data on the web. With the right tools, you can create a web service that allows users to access and manipulate data in a language they are comfortable with.
REST and Python: Building APIs
Designing a Python REST API involves several steps and considerations. There are many factors to consider when developing an API, from determining the resources and endpoints to choosing the appropriate data interchange format and creating success and error responses.
While there are many approaches to designing APIs, choosing the one that best fits your needs and requirements is essential.
1. Identify Resources
To kick off your restful python journey, and you'll need to pinpoint the resources at your API's heart. These resources often referred to as plural nouns, could be anything from consumers to transactions to events.
As you scout out the resources your web service will hold, make a list of the nouns that represent the various data types your users will be able to tinker with through the API.
Don't forget to consider any nested resources that may pop up – customers may have sales, and events may have guests. By defining these resource hierarchies, you'll have a solid foundation for your API's endpoints.
2. Define your Endpoint
Now that you've identified the resources at the core of your web service, it's time to define the endpoints that'll allow users to interact with them. These endpoints will be vital to making sure your API functions smoothly and efficiently.
{{invisible="/components"}}
Now that you have your nested resources in place, it's time to consider the endpoints that'll allow users to interact with them. For example, let's say you have a resource for events, and within that resource, you have a nested resource for guests. In that case, you might have endpoints like:
{{invisible2="/components"}}
3. Pick your data interchange format
When formatting your web service data, you've got a few options to choose from. XML and JSON are the most popular, but which you pick depends on the type of API you're working with. XML is often used with SOAP APIs, while JSON is the go-to for Python REST APIs.
For example, here's some code showing how you might format a book using XML:
XML uses a series of components to encode data, which means that each element has an opening and closing tag, as well as some data in between. Elements can also be nested within other elements, as shown in the example above, where multiple author tags are nested within an author's tag.
{{python7="/components"}}
JSON, similar to a Python dictionary, stores data as key-value pairs. Like XML, it also allows you to nest data to any level, making it a powerful tool for representing complex data.
JSON is the preferred choice for Python REST API developers, especially when working with front-end frameworks like React or Vue. That's not to say that one format is inherently better than the other – it's just a matter of personal preference and what works best for your project.
Ultimately, the choice between XML and JSON comes down to what works best for your team and your users.
4. Design success responses
Now that you've picked a data format for your Python REST API, it's time to start designing how your API will respond to HTTP requests. To ensure a consistent user experience, choosing the same format for every response, including the appropriate HTTP status code, is essential.
Let's look at some sample responses for a fictional API that manages a vehicle inventory to give you an idea of how this might work. These examples will help you understand how to structure your API responses. Keep in mind that we'll look at raw HTTP requests and responses rather than HTTP libraries.
For example, consider the following GET request to /cars, which retrieves a list of cars:
{{python8="/components"}}
In the previous example, our API responded to the GET /cars request with a list of cars and a status code of 200 OK, which indicates that the request was successful.
The response also included a Content-Type header with the value application/JSON, which tells the user to parse the response as JSON.
Always have the correct Content-Type header in your responses, setting it to application/json if you're sending JSON or application/xml if you're sending XML. This helps the user understand how to interpret the data you're sending.
In addition to the Content-Type header, it's crucial to include an appropriate status code in your response.
For example, a successful GET request should return a 200 OK status code to inform the user that their request was handled correctly.
Let's look at another example of a GET request, this time for a single car:
{{python9="/components"}}
In this response, we're providing a single JSON object with information about the car. Since we're only returning one object, we don't need to wrap it in a list like in the previous example. Like the last response, this one also has a status code of 200 OK.
{{python10="/components"}}
The 201 Created status code indicates that the request was successful and a new resource was created as a result. The Location header contains the URL of the newly created resource, in this case /cars/3. The response also includes a JSON object representing the new car that was added to the inventory.
In this response, we provide a copy of the new vehicle with an API-generated id field. This is important because it allows the user to reference the resource and make changes to it later.
Here's an example of a PUT request to update an existing car in our inventory:
{{python11="/components"}}
The 200 OK status code indicates that the request was successful and the resource was updated as a result. The response includes a JSON object representing the updated car in the inventory.
As with the PUT request, the response to a PATCH request should include a copy of the entire resource with the updated information.
Here's an example of a PATCH request to update a specific field in a car resource:
{{python12="/components"}}
The 200 OK status code indicates that the request was successful and the resource was updated as a result. The response includes a JSON object representing the updated car in the inventory.
Now, consider how your Python REST API should respond to a DELETE request. Users who want to delete a resource will send a DELETE request to the appropriate endpoint.
Here's an example of a DELETE request to remove a car from the inventory:
{{python13="/components"}}
The 204 No Content status code indicates that the request was successful. The resource was deleted as a result. No further information is required in the response, hence the No Content status.
So far, we've looked at how to design successful responses to your Python REST API for various HTTP requests. But what happens when something goes wrong? In the next section, we'll explore how your API should handle errors and other issues that might arise during a request.
5. Design error responses
As a developer, it's essential to anticipate and plan for potential errors during your Python REST API requests. By designing clear and informative error responses, you can help your users understand what went wrong and how to fix it.
For example, let's say a user requests a resource that doesn't exist in your API:
{{python14="/components"}}
The 404 Not Found status code tells the user that the requested resource couldn't be found. The response includes a JSON object with an error field explaining the issue in more detail.
Sometimes, even if a request is formed correctly, it might still be incorrect in other ways. For example, consider the following POST request with an unsupported media type:
{{python15="/components"}}
The 415 Unsupported Media Type status code tells the user that the request body is in a format that the server doesn't support. The response includes a JSON object with an error field explaining the issue in more detail.
Sometimes, even if a request has the correct format, the data might be invalid or faulty.
For example, consider the following POST request with car data that doesn't match the fields of any other car in the inventory:
{{python16="/components"}}
The 422 Unprocessable Entity status code tells the user that the request body contains well-formed data that can't be processed or understood, and the response includes a JSON object with an error field explaining the issue in more detail.
As a developer, it's your responsibility to ensure that your Python REST API can accurately and consistently handle requests and provide appropriate responses, whether successful or not. This is essential for building reliable and user-friendly apps on top of your web service.
Fortunately, several popular Python web frameworks can help you manage the complexities of processing HTTP requests and responding to them. In the next section, we'll look closely at three solutions.
Keep in mind that the choice of web framework will depend on your specific needs and preferences. It's essential to research and compare the different options to find the one that best fits your project.
Authenticating to a Python REST API
So far, we've focused on using open Python REST APIs that don't require authorisation. However, many Python REST APIs, especially those dealing with sensitive data, require you to authenticate before accessing certain endpoints.
The Python Requests library can handle several common authentication mechanisms for Python REST APIs. One of the simplest methods is HTTP Basic Auth, which involves sending your login and password to the appropriate endpoint in the request.
This is similar to entering your username and password into a login form on a website.
To use HTTP Basic Auth with the Requests library, you can pass a tuple of your login and password to the auth parameter of the get, post, put, or delete function. For example:
{{python17="/components"}}
Keep in mind that HTTP Basic Auth is not the most secure authentication mechanism, and it should not be used for sensitive data. It's also worth noting that the specific authentication method used by a Python REST API will depend on the requirements and preferences of the API developer.
There are many different types of authentication that can be used with a REST API. Some of the most common are:
1) Basic authentication
This is a simple authentication scheme where the client sends an HTTP request with a username and password in the request headers. The server checks the credentials and returns a response with the appropriate status code (e.g., 200 OK for successful authentication).
2) API key
This is a simple authentication scheme where the client includes an API key in the request headers or query string. The server checks the API key and returns a response with the appropriate status code.
3) OAuth
This is an open standard for authorisation that allows the client to access resources on behalf of a user. OAuth involves obtaining an access token from an authorisation server and using that token to authenticate future requests to the API.
4) JWT (JSON Web Token)
This is a JSON-based standard for creating access tokens that can be used to authenticate requests to an API. The client obtains a JWT from an authorisation server and includes it in the request headers to authenticate with the API.
5) SAML (Security Assertion Markup Language)
This is an XML-based standard for exchanging authentication and authorisation data between systems. SAML allows a user to use a single credential to access multiple applications.
6) HTTP digest authentication
This is a more secure form of basic authentication where the client and server both create a hash of the password using a nonce (a unique value generated by the server) and other data. The client sends the hash in the request instead of the plaintext password, and the server checks the hash to authenticate the request.
Manage access token using sessions
As you work with the Python Requests library to make API requests, you may find it helpful to use Session objects to manage a single session with the API.
A session allows you to store parameters required for making multiple requests within a session, such as access tokens. It can also improve the speed of your requests by maintaining session cookies and eliminating the need to establish a new connection for each request.
To create a Session object in Python Requests, you can use the Session class like this:
{{python18="/components"}}
Keep in mind that the specific parameters and settings used by a Session object will depend on the requirements and preferences of the API you're working with.
How to handle HTTP Errors with Python Requests
When using the Python Requests library to make HTTP requests, you can handle HTTP errors using the Response.raise_for_status() method. This method will raise an HTTP error if the response status code indicates a client or server error.
Here's an example of how you can use raise_for_status() to handle HTTP errors:
{{python19="/components"}}
Note that you should wrap your code in a try-except block when calling raise_for_status() to catch the HTTPError that it raises.
Python and REST: Best tools for Python REST APIs
In this tutorial, you will learn about three frameworks for creating a Python REST API. These frameworks are Django REST framework, Flask, and Pyramid. We will examine the advantages and disadvantages of each framework and provide examples for creating a Python REST API that manages a list of countries.
The country data will include the name, capital, and area in square kilometres. The data for the API will be stored in a Python list, except for the Django REST framework example, which uses an SQLite database provided by Django.
The endpoint for all three examples will be "nations", and the data format will be JSON. It is important to note that this tutorial does not cover connecting to a database.
1. Django REST Framework
The Django REST framework is a popular option for creating a Python REST API. It is a plugin for Django that allows you to add REST API functionality to a Django project.
If you already have a Django project, you can use the Django REST framework to enhance it. If not, you can install Django, and the Django REST framework using pip and create a new Django project using the Django-admin tool.
To create a new Django project, use the following command: django-admin startproject countryapi
This will create a new folder called countryapi in your current directory, containing all the files needed to run your Django project. Next, you will create a new Django application within your project to handle different aspects of the project.
To make the application, navigate to the countryapi folder and use the following command: Django-admin startapp nations.
This will create a new folder called nations within your project, containing the base files for the application. To inform Django about the new application and the Django REST framework, open the settings.py file in the countryapi folder and
'rest_framework', 'nations'
With these steps, you have set up a Django project and application and installed the Django REST framework. You are now ready to start building your Python REST API.
{{python20="/components"}}
To define the fields of your data. You need to create a Django model. A model is a class that represents the data you want to store and is used to create a database schema for the data.
To create a model, open the models.py file in the nations application and add the following code:
{{python21="/components"}}
This model defines a Country class with three fields: name, capital, and area. The name and capital fields are both CharFields with a maximum length of 200 characters, and the area field is an IntegerField.
After you have defined your model, you need to run a migration to create the corresponding database table. To do this, use the following command:
python manage.py makemigrations
python manage.py migrate
The makemigrations command generates the necessary migration files for your model, and the migrate command applies those migrations to your database. This will create the Country table in your database and you can use it to store and retrieve data in your Python REST API.
It is important to run these commands anytime you make changes to your models, as it ensures that the database schema is up to date with the latest model definitions.
A Django migration is a way to create or modify a database schema. Migrations are used to keep track of changes to the database schema and apply those changes when necessary.
In this case, you are using migration to create a new table in the database based on the Country model you defined. After running the migration, the Country table will be created in the database, but it will be empty.
You can use a Django fixture to populate the table with some data. A fixture is a JSON file that contains the data you want to import into your database. To create a fixture, copy the following JSON data into a file called nations.json in the nations directory:
{{python22="/components"}}
This fixture contains three countries: the United States, Mexico, and Canada. To load the fixture into your database, use the following command:
python manage.py loaddata nations.json
This will import the data from the fixture into the Country table in the database. You can now use the Django REST framework to create API endpoints for accessing this data.
After running the migration and loading the fixture, your Django application is set up and populated with data. You can now use the Django REST framework to create API endpoints for accessing this data.
To use the Django REST framework, you must create a serializer to convert your model instances to JSON. A serializer is a class that defines how to serialize and deserialize model instances.
To create a serializer for the Country model, create a serializers.py file in the nations application and add the following code:
{{python23="/components"}}
This serializer defines a CountrySerializer class that specifies the Country model as the model to serialize and specifies the name, capital, and area fields to include in the serialized data.
With the serializer in place, you can now use the Django REST framework to create API endpoints for accessing the data in the Country model.
The CountrySerializer is a serializer that subclasses the ModelSerializer class provided by the Django REST framework. The ModelSerializer generates JSON content automatically based on the fields of the Country model.
By default, a ModelSerializer will include all fields from the model in the serialized data.
Still, you can specify a list of fields to include or exclude using the fields attribute.
In the Django REST framework, views are used to handle incoming HTTP requests and return HTTP responses. You can create your views from scratch, but it is often more convenient to use the provided ViewSet classes, which contain default views for common API actions.
One such class is the ModelViewSet, which provides default views for typical CRUD (create, read, update, delete) operations on a model. To use the ModelViewSet class, you will need to create a viewset and specify the ModelSerializer and the model you want to use.
Here is an example of a CountryViewSet using the CountrySerializer and Country model:
{{python24="/components"}}
With this viewset in place, you can use the Django REST framework's default views to perform CRUD operations on the Country model.
In the CountryViewSet class, the serializer_class attribute is set to CountrySerializer, and the queryset attribute is set to Country.objects.all(). This tells the viewset to use the CountrySerializer for serializing and deserializing data and the Country.objects.all() queryset to retrieve a list of all countries from the database.
Once you have created your views, you need to map them to URLs or endpoints. In Django REST framework, you can use a Router class to generate URLs for your views automatically.
{{python25="/components"}}
This code creates a DefaultRouter and registers the CountryViewSet with it using the register method. The DefaultRouter will automatically generate URLs for the views in the CountryViewSet using the name 'countries'. The generated URLs will include URLs for listing, creating, retrieving, updating, and deleting countries.
Finally, the urlpatterns list includes the URLs generated by the router using the include function. This will add the URLs to your Django project's URLconf.
With these steps, you have set up the Django REST framework and created a set of views for performing CRUD operations on the Country model. You can now use these views to access and manipulate data in your Python REST API.
To make the URLs for the CountryViewSet available in your Django project, you need to include them in the project's URLconf. To do this, open the urls.py file in the countryapi folder and replace the following code:
{{python26="/components"}}
This code includes the URLs for the CountryViewSet under the api/ URL namespace. With this change, you can access the views for the CountryViewSet at URLs like /api/countries/ and /api/countries/1/.
With these steps, you have set up a Python REST API using the Django REST framework and created a set of views for performing CRUD operations on the Country model. You can now use these views to access and manipulate data in your API.
With the URLs for the CountryViewSet included in the project's URLconf, you can now use your Django-based Python REST API. To start the Django development server, run the following command in the root countryapi directory:
python manage.py runserver
You can now perform HTTP requests to the API to access and manipulate data.
To receive a list of all the countries in your Django project, perform a GET request to http://127.0.0.1:8000/api/countries/. This will return a JSON array containing all of the countries in the database.
By default, the Django REST framework will return a JSON response containing all of the countries in the database when you perform a GET request to http://127.0.0.1:8000/api/countries/. The response will be similar to the following:
{{python27="/components"}}
Note that the actual response may be formatted differently, as it depends on the specific implementation of the Django REST framework.
The Django REST framework provides several standard API endpoints for performing CRUD operations on a model. These endpoints are automatically generated by the DefaultRouter you created in nations/urls.py. Some examples of these endpoints include:
{{python28="/components"}}
You can use these endpoints to perform various actions on the Country model, such as retrieving a list of all countries, creating a new country, updating an existing country, or deleting a country.
2. Flask
To create a Python REST API with Flask, you can use the following example as a starting point:
{{python29="/components"}}
This code creates a Flask application with a single route, /, that returns the string "Hello, World!". To start the Flask development server, run the following command:
python app.py
This will start the development server at http://127.0.0.1:5000/. You can access the route at http://127.0.0.1:5000/ in your web browser or using an HTTP client.
To create a Python REST API with Flask, you can define additional routes and functions to handle HTTP requests and return HTTP responses. You can also use Flask's built-in support for JSON encoding and decoding to serialize and deserialize data in your API easily.
For example, to create an endpoint for retrieving a list of countries, you can add the following route and function to your Flask application:
{{python30="/components"}}
This function returns a JSON object containing a list of countries. You can access this endpoint at http://127.0.0.1:5000/countries.
You can also use Flask's request parsing and response formatting support to handle incoming and return data in different formats. For example, you can use the request.json attribute to access JSON data in the request body and the jsonify function to return a JSON response.
You can create a fully functional Python REST API using Flask with these capabilities.
To set the FLASK_APP environment variable to app.py, run the following command in the terminal:
export FLASK_APP=app.py
This tells Flask which file your application is stored in. You can also set the FLASK_ENV environment variable to development to run Flask in debug mode:
export FLASK_ENV=development
In debug mode, Flask will automatically restart the application after code changes and provide helpful error messages. Without debug mode, you would need to restart the server every time you made a change manually.
Once you have set the environment variables, you can start the Flask development server by running the following command:
flask run
This will start the development server at http://127.0.0.1:5000/. You can access the /countries endpoint at http://127.0.0.1:5000/countries using an HTTP client or web browser.
You can use the /countries endpoint to retrieve a list of countries by sending a GET request, or to add a new country by sending a POST request with a JSON object representing the new country in the request body.
3. FAST API
FastAPI is an efficient Python web framework that is designed explicitly for creating APIs. It utilises Python's type hints and offers built-in asynchronous support. FastAPI is a high-performance API framework built on top of Starlette and Pydantic.
Below is an example of a Python REST API created with FastAPI:
{{python31="/components"}}
In this example, we'll use the FastAPI framework to build a Python REST API for our list of countries. FastAPI is a modern web framework for building APIs with Python 3.6+ based on standard Python-type hints.
To start with FastAPI, you'll need to install it using pip:
pip install fastapi
You'll also need to set up uvicorn, a server that can run FastAPI applications. To install uvicorn, run the following command:
pip install uvicorn
Once you have both FastAPI and uvicorn installed, you can save the following code in a file called app.py:
{{python32="/components"}}
To start a development server and try out your FastAPI application, run the following command:
uvicorn app:app --reload
This will start the server and make your API available at http://localhost:8000. You can use a tool like Postman to send requests to the API and see the responses.
With FastAPI, you can create a simple Python REST API that returns a JSON array of countries in response to a GET request to the /nations endpoint. You can also use a POST request to the /countries endpoint to add a new country to the list.
Here's an example of how you might use FastAPI to handle a POST request:
{{python33="/components"}}
In this example, the create_country function takes a Country object as an argument and returns a dictionary with the name, capital, and area of the country
After adding a new country to the list using a POST request, you can confirm that it was added by sending a GET request to the /countries endpoint. This will return the updated list of countries.
For example, you might use FastAPI to handle a GET request like this:
{{python34="/components"}}
Where countries is a list of dictionaries containing the name, capital, and area of each country.
Like the Flask application, the FastAPI application has a straightforward structure. However, FastAPI is specifically designed to help you create APIs that utilise modern Python features. It doesn't try to cover every aspect of web application development but focuses on providing the tools you need to build high-performance APIs.
One of the key features of FastAPI is the ability to use classes to define the data structure of your API.
For example, in the app.py file, you might define a Country class that extends BaseModel like this:
{{python35="/components"}}
This Country class defines the data structure for a single country, with fields for the name, capital, and area. You can then use this class to validate incoming data and define the shape of your API responses.
Keep in mind that the specific implementation details of your FastAPI application will depend on your requirements and preferences.
In this example, you can see the power of using Pydantic models in FastAPI. Using Python type annotations in the Country class, FastAPI can automatically generate JSON for API endpoints with the correct data types. Pydantic models also allow for the automatic validation of incoming JSON data.
{{python36="/components"}}
This line uses the id variable to store an integer that represents the country's ID, and uses the Field function from Pydantic to modify the behavior of the id field.
The default_factory argument is set to _find_next_id(), meaning that when a new Country is created, the function defined by default_factory will be run to allocate an id for the country.
The alias argument is set to id, which instructs FastAPI to output the key "id" in the JSON rather than "country id".
This demonstrates how Pydantic models in FastAPI allow you to easily customise the behaviour of fields and automatically handle generating and validating the data in your API endpoints.
How to make robust Python REST API Requests?
Several ways to make robust Python REST API requests:
1) Use a REST API client
There are several REST API clients available for Python that make it easy to send HTTP requests and receive responses. Some popular options include requests, httpx, and treq.
These libraries abstract away many of the low-level details of making requests and handling responses and provide a convenient interface for interacting with REST APIs.
2) Use exception handling
When making requests to a REST API, it's essential to handle exceptions that may occur due to connection errors, invalid responses, or other issues. You can do this by using try and except blocks to catch exceptions and handle them appropriately.
3) Use retries
It's a good idea to implement retries in your code when requesting a REST API, in case of temporary failures or intermittent connection issues. You can use the Retry object from the requests library to specify the number of retries and the conditions under which they should be performed.
4) Validate responses
It's essential to validate the responses you receive from a REST API to ensure that they are in the expected format and contain the data you need. You can use tools such as JSON Schema to validate the structure of JSON responses or write custom validation logic in your code.
5) Use HTTP caching
It can improve the performance and reliability of your application by allowing you to store the results of API requests and reuse them for a certain period of time rather than making a new request to the API for each request. You can use the CacheControl library to add HTTP caching to your Python application.
How to use Python Requests with REST APIs
The requests library is a popular Python library for making HTTP requests. You can use it to make HTTP requests to a REST API and process the response.
{{python37="/components"}}
You can also specify additional parameters, such as headers and query strings, when making requests using the requests library.
How to Request Data With GET?
To request data with the HTTP GET method in Python, you can use the requests library to send an HTTP GET request to a server and retrieve the data in the response.
Here is an example of how to use the requests.get() function to send a GET request and retrieve data from the JSONPlaceholder API, a fake REST API for testing and prototyping:
{{python38="/components"}}
This code sends a GET request to the /posts endpoint of the JSONPlaceholder API, and if the request is successful (i.e. the status code is 200 OK), it prints the list of posts returned by the API.
How to use Query Parameters?
Query parameters are used to pass additional information in the query string of a URL when making a request. They are often used in REST APIs to filter, sort, or paginate data.
In Python, you can use the requests library to add query parameters to a request by passing a dictionary of parameters as the params keyword argument to the appropriate function (e.g. requests.get(), requests.post(), etc.).
For example, you can use query parameters to filter the results of a GET request to the JSONPlaceholder API, which is a fake REST API for testing and prototyping:
{{python39="/components"}}
This code sends a GET request to the /posts endpoint with a query string parameter userId=1, which filters the results only to include posts with a userId of 1.
How to create & modify Data with POST & PUT?
To create or modify data with the HTTP POST and PUT methods in Python, you can use the requests library to send an HTTP POST or PUT request to a server with the data you want to create or modify.
Here is an example of how to use the requests.post() function to create a new resource with the JSONPlaceholder API, which is a fake REST API for testing and prototyping:
{{python40="/components"}}
This code sends a POST request to the /posts endpoint with a JSON payload containing the data for the new post. If the request is successful (i.e. the status code is 201 Created), it prints the details of the newly created post.
You can use the requests to modify an existing resource using the PUT method.put() function in a similar way. For example:
{{python41="/components"}}
This code sends a PUT request to the /posts/1 endpoint with a JSON payload containing the updated data for the post. If the request is successful (i.e. the status code is 200 OK), it prints the details of the updated post.
How to Access REST Headers?
To access HTTP headers in a REST API request or response in Python, you can use the headers attribute of the Response object returned by the requests library.
For example, here is how you can access the headers of a response from a GET request to the JSONPlaceholder API, which is a fake REST API for testing and prototyping:
{{python42="/components"}}
This code sends a GET request to the /posts endpoint of the JSONPlaceholder API, and if the request is successful (i.e. the status code is 200 OK), it prints the headers of the response.
How to Authenticate to a Python REST API?
There are several ways you can authenticate to a Python REST API, depending on the specific authentication scheme used by the API. Here are some common approaches:
Basic authentication:
Basic authentication is a simple authentication scheme in which the client sends an HTTP request with an Authorization header containing the username and password, encoded using base64. Here is an example of how to use basic authentication with the requests library:
{{python43="/components"}}
Token-based authentication:
In token-based authentication, the client sends an HTTP request with an Authorization header containing a token, which is a unique string that identifies the client and is issued by the server. Here is an example of how to use token-based authentication with the requests library:
{{python44="/components"}}
OAuth2:
OAuth2 is a widely used authorisation framework that enables clients to access resources on behalf of a user.
To use OAuth2 with the requests library, you will need to obtain an access token from the server using the OAuth2 flow and then include the access token in the Authorization header of your requests. Here is an example of how to use OAuth2 with the requests library:
{{python45="/components"}}
Use Sessions to Manage Access Tokens
The requests library in Python provides a Session object that allows you to persist certain parameters across requests. This can be useful when you need to use an access token to authenticate to a REST API, as it allows you to avoid having to include the Authorization header in every request.
Here is an example of how to use a Session object to manage an access token for OAuth2 authentication:
{{python46="/components"}}
In this example, the Authorization header with the access token is set in the session, and all requests made using the session will include this header. This allows you to avoid including the Authorization header in every request.
How to Handle HTTP Errors With Python Requests?
HTTP errors are common when using the Python Requests library to make HTTP requests. These errors occur when the server returns a status code that falls into the 4xx or 5xx range, indicating a client or server error.
It is important to handle these errors properly in your code, as they can indicate a problem with your request or the server you are requesting from.
The Basics of HTTP Status Codes
HTTP status codes are an essential part of the communication between client and server. As such, it’s important to understand the different types of codes and what they mean. Let’s look at the five main categories of codes:
1) 1xx Informational:
These codes are mainly used for communication purposes. They provide the client with information about the request, such as whether it was received, and how it should be processed. These codes are not intended to cause any action.
2) 2xx Successful:
These codes indicate that the server was able to process the request successfully. This includes requests such as GET, POST, and PUT.
3) 3xx Redirection:
These codes are used to redirect the user to a different resource. This can be used to direct a user to a different page on the same site, or to a different website altogether.
4) 4xx Client Error:
These codes indicate that there was an issue with the request made by the client. This can be due to a missing parameter, incorrect syntax, or an invalid request.
5) 5xx Server Error:
These codes indicate an issue with the server. This can include things like an internal server error or a timeout error.
Now that you understand the different types of HTTP status codes, let’s talk about how to handle them in Python Requests. When making requests with Python Requests, you can access the response's status code by using the .status_code attribute.
How to check for HTTP Errors with Python Requests?
To check for HTTP errors with Python Requests, you can use the try and except statements and the raise_for_status() method. Here is an example of how you can do this:
{{python47="/components"}}
In this example, the raise_for_status() method will raise an exception if the HTTP request returns an unsuccessful status code (4xx or 5xx). You can then catch the exception and handle it appropriately in the except block.
You can also manually check the response's status code and handle the error yourself, like this:
{{python48="/components"}}
There are other types of errors that you may want to check for when using Python Requests. Here are a few examples:
1. Too many redirects
If you are following redirects and the number of redirects exceeds the maximum limit, a TooManyRedirects exception will be raised. You can catch this exception and handle it appropriately.
To fix this issue, it’s probable that the URL you’re using to access the resource is incorrect and has to be modified.
{{python49="/components"}}
2. Connection error
If there is a problem establishing a connection to the server, a ConnectionError exception will be raised. You can catch this exception and handle it appropriately.
When your client cannot connect to the server, Python Requests throws the ConnectionError exception.
{{python50="/components"}}
3. Timeout
If a request times out, a Timeout exception will be raised. You can set the timeout limit when making the request, and you can catch this exception and handle it appropriately.
{{python51="/components"}}
How to make robust API Requests?
To make robust API requests, you can use the following strategies:
1. Use the try, and except statements to handle errors.
By using the try and except statements, you can catch exceptions that may occur when making an API request and handle them appropriately. This can help prevent your code from crashing and make it more resilient to errors.
2. Use the retry module to retry failed requests
If an API request fails; you can use the retry module to retry the request a specified number of times before giving up. This can help improve the reliability of your code by increasing the chances of a successful request.
3. Use exponential backoff when retrying requests
When retrying requests, you can use exponential backoff to increase the amount of time between retries gradually. This can help avoid overwhelming the API server with too many requests in a short period of time.
4. Use the timeout parameter to set a request timeout.
By setting a timeout for API requests; you can avoid waiting indefinitely for a response. If the request takes longer than the specified timeout, a Timeout exception will be raised, and you can handle it appropriately.
5. Use the headers parameter to send additional information with the request.
The headers parameter allows you to send additional information, such as the user agent, with the API request. This can help identify the request's source and provide additional context to the API server.
6. Use the verify parameter to verify the server's SSL certificate.
The Python Requests library will verify the server's SSL certificate to ensure a secure connection. If you need to disable this feature, you can set the verify parameter to False. However, be aware that this can make your connection vulnerable to man-in-the-middle attacks.
7. Use the allow_redirects parameter to control how redirects are handled
The allow_redirects parameter allows you to specify whether or not to follow redirects when making an API request. You can set this parameter to True to follow redirects or False not to follow them.
8. Use the proxies parameter to route requests through a proxy server
If you need to route your API requests through a proxy server, you can use the proxies parameter to specify the proxy server's address. This can be useful if you are making requests from behind a firewall or need to route your requests through a specific server.
9. Use the auth parameter to authenticate the request.
If the API you are requesting from requires authentication, and you can use the auth parameter to provide the necessary credentials. This can be a tuple containing the username and password or an HTTP auth object.
10. Use the cookies parameter to send cookies with the request.
The cookies parameter allows you to send cookies with the API request. This can be useful if the API you are requesting requires cookies for authentication or to maintain a session.
Using these strategies, you can make more robust API requests with Python Requests that can handle errors and various types of input better.
Conclusion
Python's Requests library makes sending HTTP requests easy and interacts with REST APIs. Using the techniques shown in this guide, you can make API requests and process the response data in various formats.
Whether using a public API to retrieve data or building your API to expose your data, Python's Requests library is a powerful tool that can help you get started quickly and easily.
By following the best practices outlined in this guide, you can build reliable and robust API clients that are easy to maintain and improve over time.
drives valuable insights
Organize your big data operations with a free forever plan
An agentic platform revolutionizing workflow management and automation through AI-driven solutions. It enables seamless tool integration, real-time decision-making, and enhanced productivity
Here’s what we do in the meeting:
- Experience Fynd Boltic's features firsthand.
- Learn how to automate your data workflows.
- Get answers to your specific questions.