Workplace chaos is time-consuming. After juggling between client meetings and team workflows, every other business owner is now genuinely seeking an AI tool that can actually make its mark, not just create hype.
This is what made us test Google Gemini (formerly Bard) on a serious note. I am not into tech, but my focus is only on getting real results without any manual back-and-forth between the teams. This is what I truly wanted from it.
After spending a few weeks testing it with real-world business scenarios, I almost ended up performing all the basic tasks like writing ad copies, video scripts, drafting proposals, and even analyzing customers’ feedback.
The free plan was fine and decent enough. Somewhere, its accuracy caught my attention. I feel ChatGPT offers a much freer plan in most things.
Then, I tried the Gemini Advanced plan. This really changed my perspective about it, I mean, the features like Gemini Live, Full-suite Deeper Research tool, Canvas, and other advanced features were worth paying for.
If your team deeply relies on the Google ecosystem, you would love its advanced plan. To share my knowledge and experience with you, I have curated this detailed guide. This will help you know and understand if it's worth investing your time and money.
Google Gemini - A detailed overview
Google Gemini is a powerful and smooth multimodal AI that can handle code, images, text, and audio within a single chat thread. I enjoyed playing around with it. Its integration with Google Workspace made our workflow far better and seamless.
Using it, we could seamlessly perform multitasking with efficiency. I even tested the Gemini 1.5 Pro model. With this model, you can get up to 1 million tokens (Not all users get it). But, it may be rate-limited or only for Advanced/enterprise users.
We luckily got these tokens (even though it was rate-limited). My team could use it for extracting real-time information, processing long documents, and analyzing code.
The cherry on the cake was its ‘Deep Research’ feature. We had a great experience with it. This helped to improve our productivity quickly with accurate references and citations.
Here’s what it can do:
- Translate languages and understand deep contextual texts.
- Explain complex concepts in simple steps.
- Assist you with math or logic problems.
- Provide smart replies and suggestions in Google Workspace applications like Docs, Spreadsheets, etc.
- Write context-based articles, emails, and even summaries in a natural human tone.
- Generate images with Imagen 3.
- Write, edit, and explain code in different languages.
- Analyze images, charts, and even screenshots for better insights and pattern understanding.
- Easily understand and respond to your questions with a voice input.
- Write creative content pieces such as captions, poems, copies, and even design ideas.
- Can brainstorm ideas with you on product names, strategies, campaigns, etc.
- It can help you in planning your vacation. It can prepare to-do lists, schedules, and even an entire itinerary.
Gemini vs ChatGPT - A detailed comparison
How is Gemini Advanced different?
After testing both the Gemini Free and the Gemini Advanced plan for several weeks, I felt that the free version is decent enough to carry out lightweight tasks like code fixes, asking queries, basic image generation, and writing simple content, blogs.
But when I moved on to the Gemini Advanced plan, it instantly filled in the gap and was able to take up tasks like real-time voice chat, document analysis, and communicate smartly.
The best part was when it offered deep reasoning, advanced coding features, and better file handling capabilities. If you are someone in the research field or in handling large data, this can be a turning point for you.
Practically, it was fantastic here:
- Easy to hold long conversation sessions, as it has good memory with up to 1 million tokens. I liked how I could lie back and keep chatting with it without changing chat threads. (In the free version, the chat thread resets automatically after 30 minutes of inactivity.)
- If you are more into deep logical reasoning, it offers deep-reasoning conversations with Gemini 2.5 Pro and Gemini 2.0 Flash Thinking. (This is not available for free users.)
- Allows to have a live interaction with Gemini Live (Live chat). This is impressive for free-flowing and natural conversations. (You do not get this in the free plan.)
- Works wonderfully when it comes to analyzing PDFs, spreadsheets, and code files. (Free plan often has several restrictions, which may not be feasible for your needs.)
- Allows you to upload any files up to 100MB for each one. Besides that, you can even upload multiple files in a single session. (In the free plan, you cannot upload a file more than 20MB and 5 files per session.)
- If you are into academic writing, it can help you conduct real-time citations and reference-backed research using the Deep Research feature. (If you are on a free tier, it offers certain limitations.)
- If you are not a text person, the Gemini Advanced plan allows you to interact via audio and upload images, too. (Free plan restricts you to text only. As far as uploading images is concerned, only JPG and PNG are applicable.)
- If Google applications like Docs, Spreadsheets are your go-to ones for office work, it offers smart AI features for content suggestions, auto replies, etc. (Free plan only responds well to basic prompts.)
- For beginners and experts in coding, it allows you to debug and and generate full code blocks with functional-based logic. (Free plan only offers syntax explanations.)
Gemini Free vs Advanced plan - Features comparison
How to Use Gemini on the Web?
Glance through all the steps that help you use Gemini on the Web:
Step 1 - Visit gemini.google.com and sign in to your Google account
Step 2 - Type your prompt in the message box:
- Like or dislike the answer
- Copy it
- Share it with your team
- Listen to it via Voice Mode
- Ask Gemini to redo it (give a better prompt)
Step 3 - Upload images or files
Step 4 - Try its built-in tools
Step 5 - Review and manage your chats
Now, let’s dive into each one of them.
1. Visit gemini.google.com and sign in to your Google account
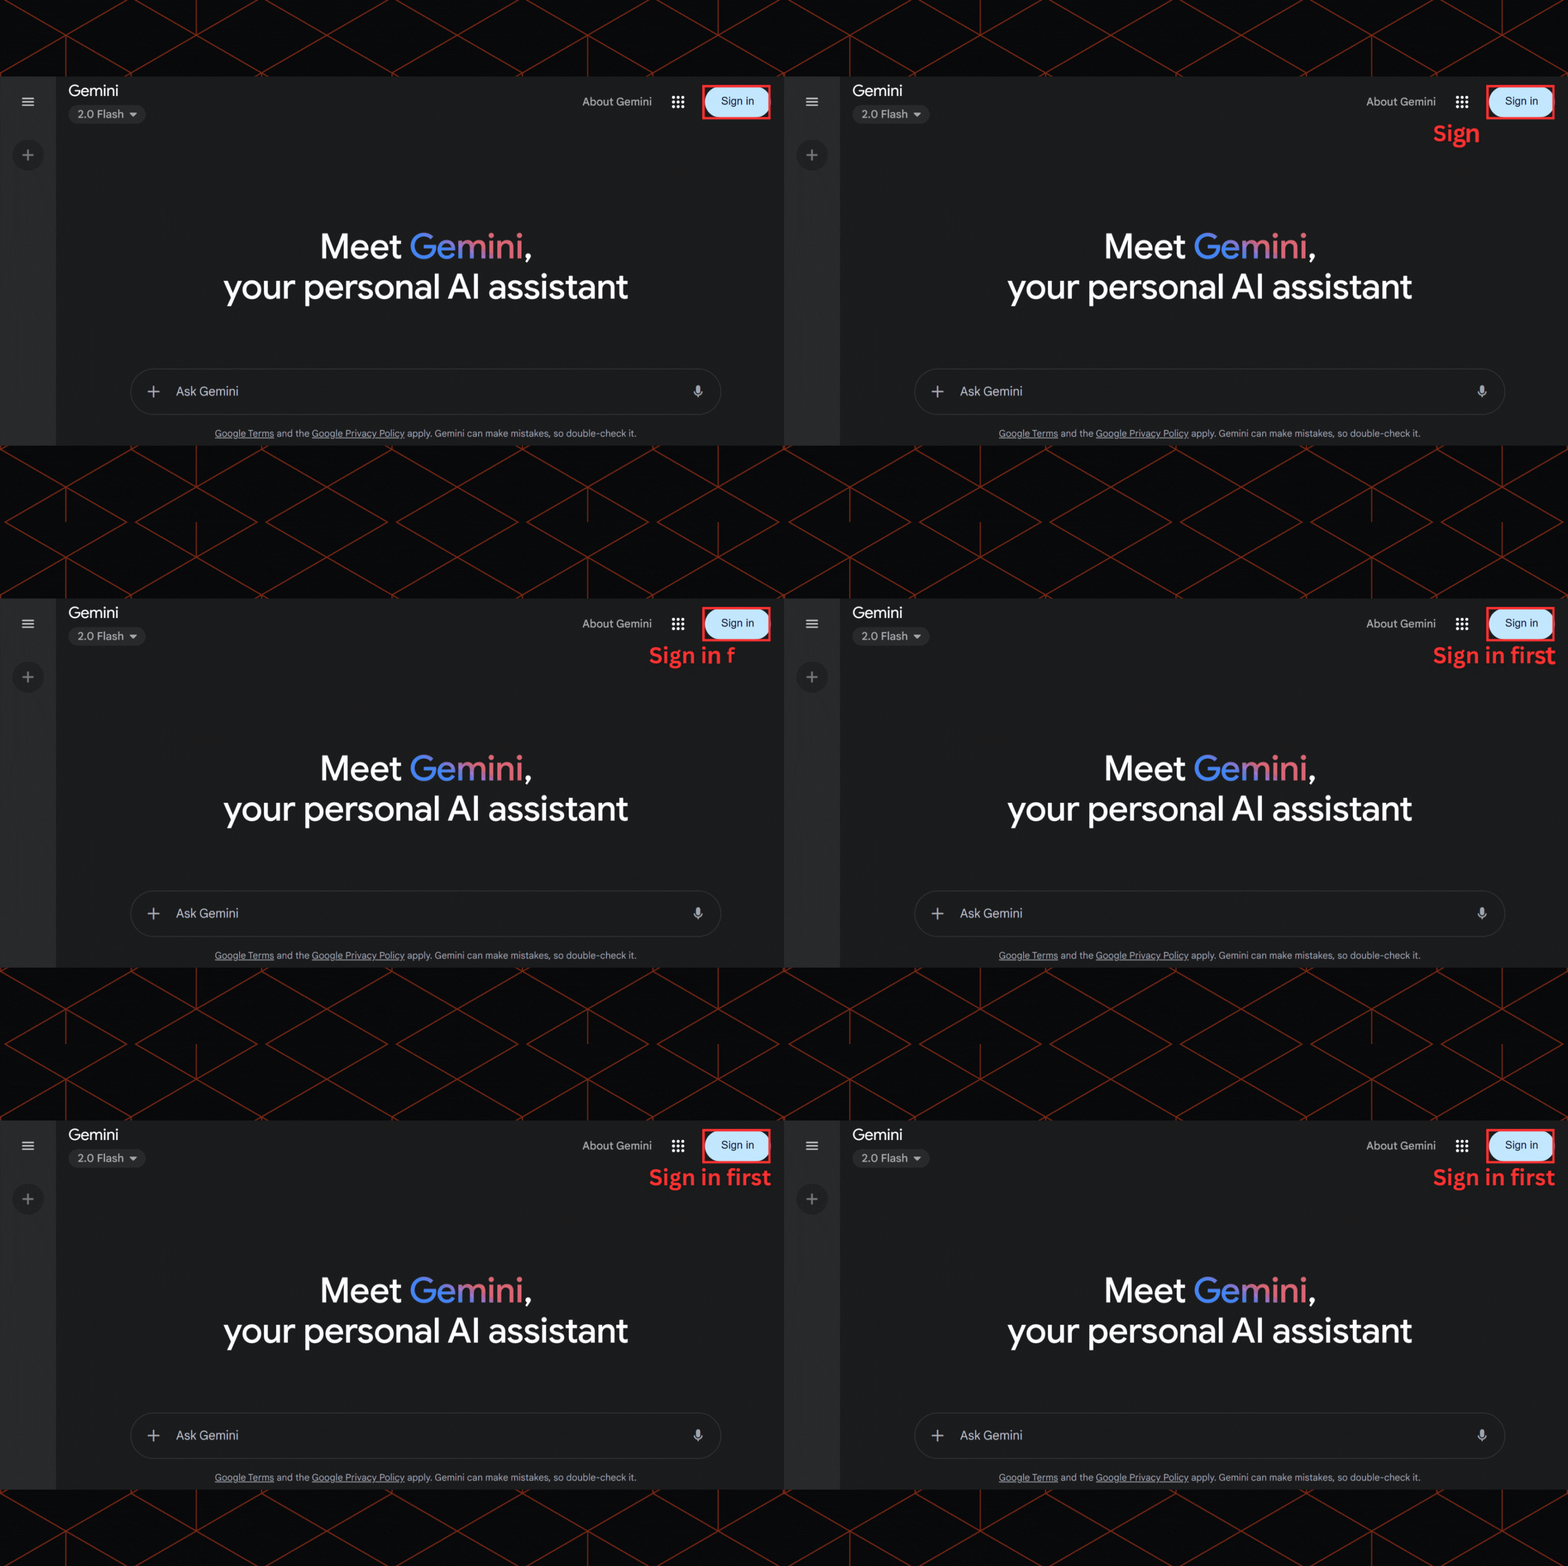
Using Chrome or any other supported browser, type in gemini.google.com and sign in to your Google account.
In case you already have a subscription to its Workspace ‘Enterprise’ plan or Gemini Advanced plan, you will be able to access its full features.
If you are looking for AI features after signing up, you need to know that it is only accessible if you have a subscription to its Business Standard, Plus, or Enterprise plan. With a basic ‘Business Starter’ plan, you will only be able to access its basic tools like ‘Smart fills in Sheets’, ‘Help me write’ in Google Docs/Gmail.
If you are on your free trial of the Gemini Advanced plan (at present it is a part of Google One AI Premium Plan), you will clearly see a label of ‘Gemini Advanced’ at the top left corner. You will see this with a prompt that shows a number of days left in your trial period.
The interface was clean and easy to explore, with a chat box in the middle and a (+) icon to add files or access other tools (limited features). You can use this to test Gemini 1.5 Pro, file analysis, and even coding-based assistance.
2. Type your prompt in the message box
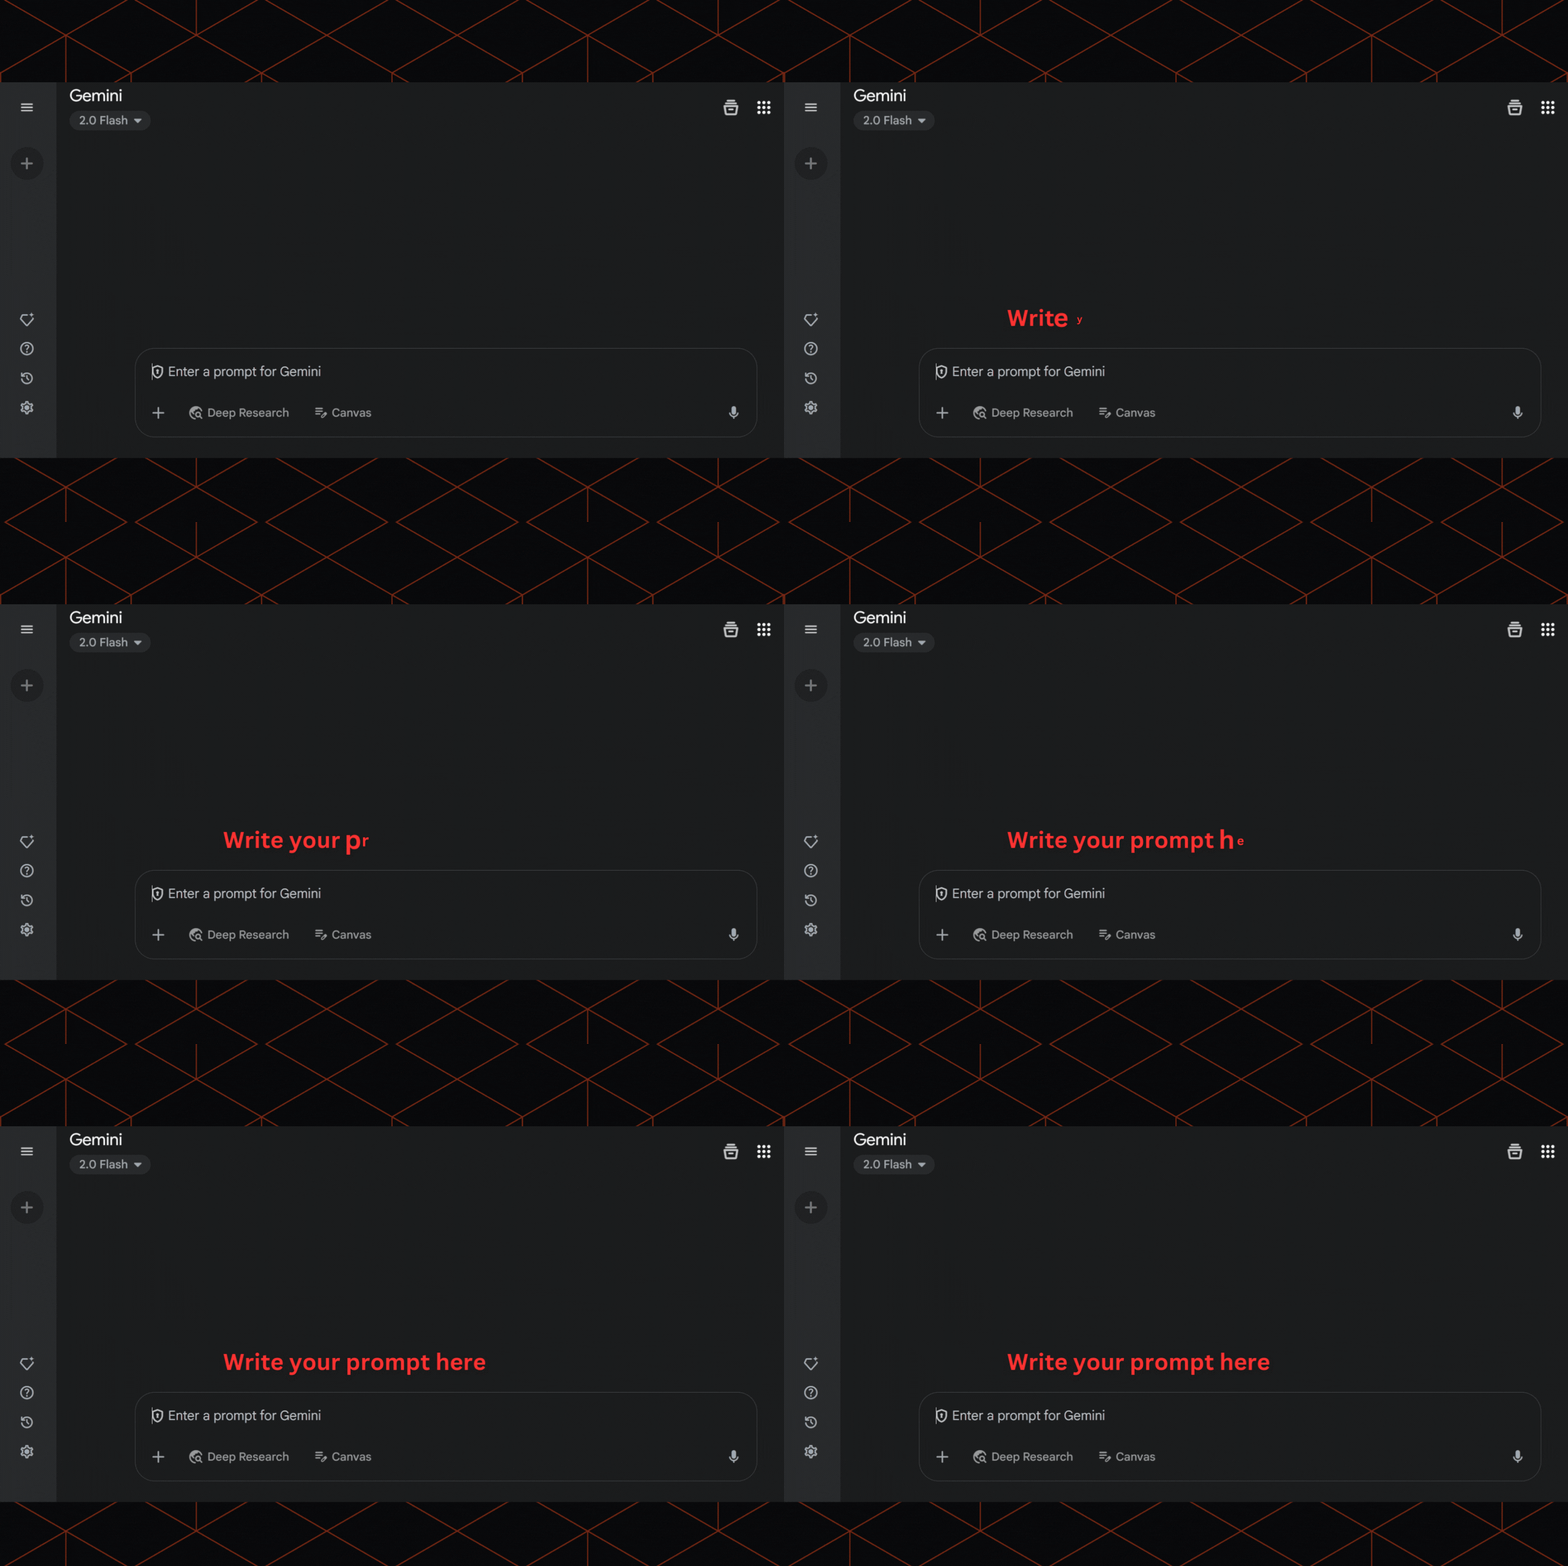
After signing up, you can start asking questions, uploading files. From drafting an email to writing code, copies, it can do many things. After it replies, you will see that some tools can help you refine the response. This is a game-changer, trust me.
If you liked the response, you can like it. This will indicate that it can write similarly in the future. Then, you can copy and share it directly with your client/boss/team.
In case you want a better response with some corrections, you can dislike it and ask to refine the response (specify what is missing in the prompt). If you're running late and can’t read the refined response, you can simply ask Gemini to read it aloud. This saved most of our time and helped us evaluate alternate versions quickly.
3. Upload images or files
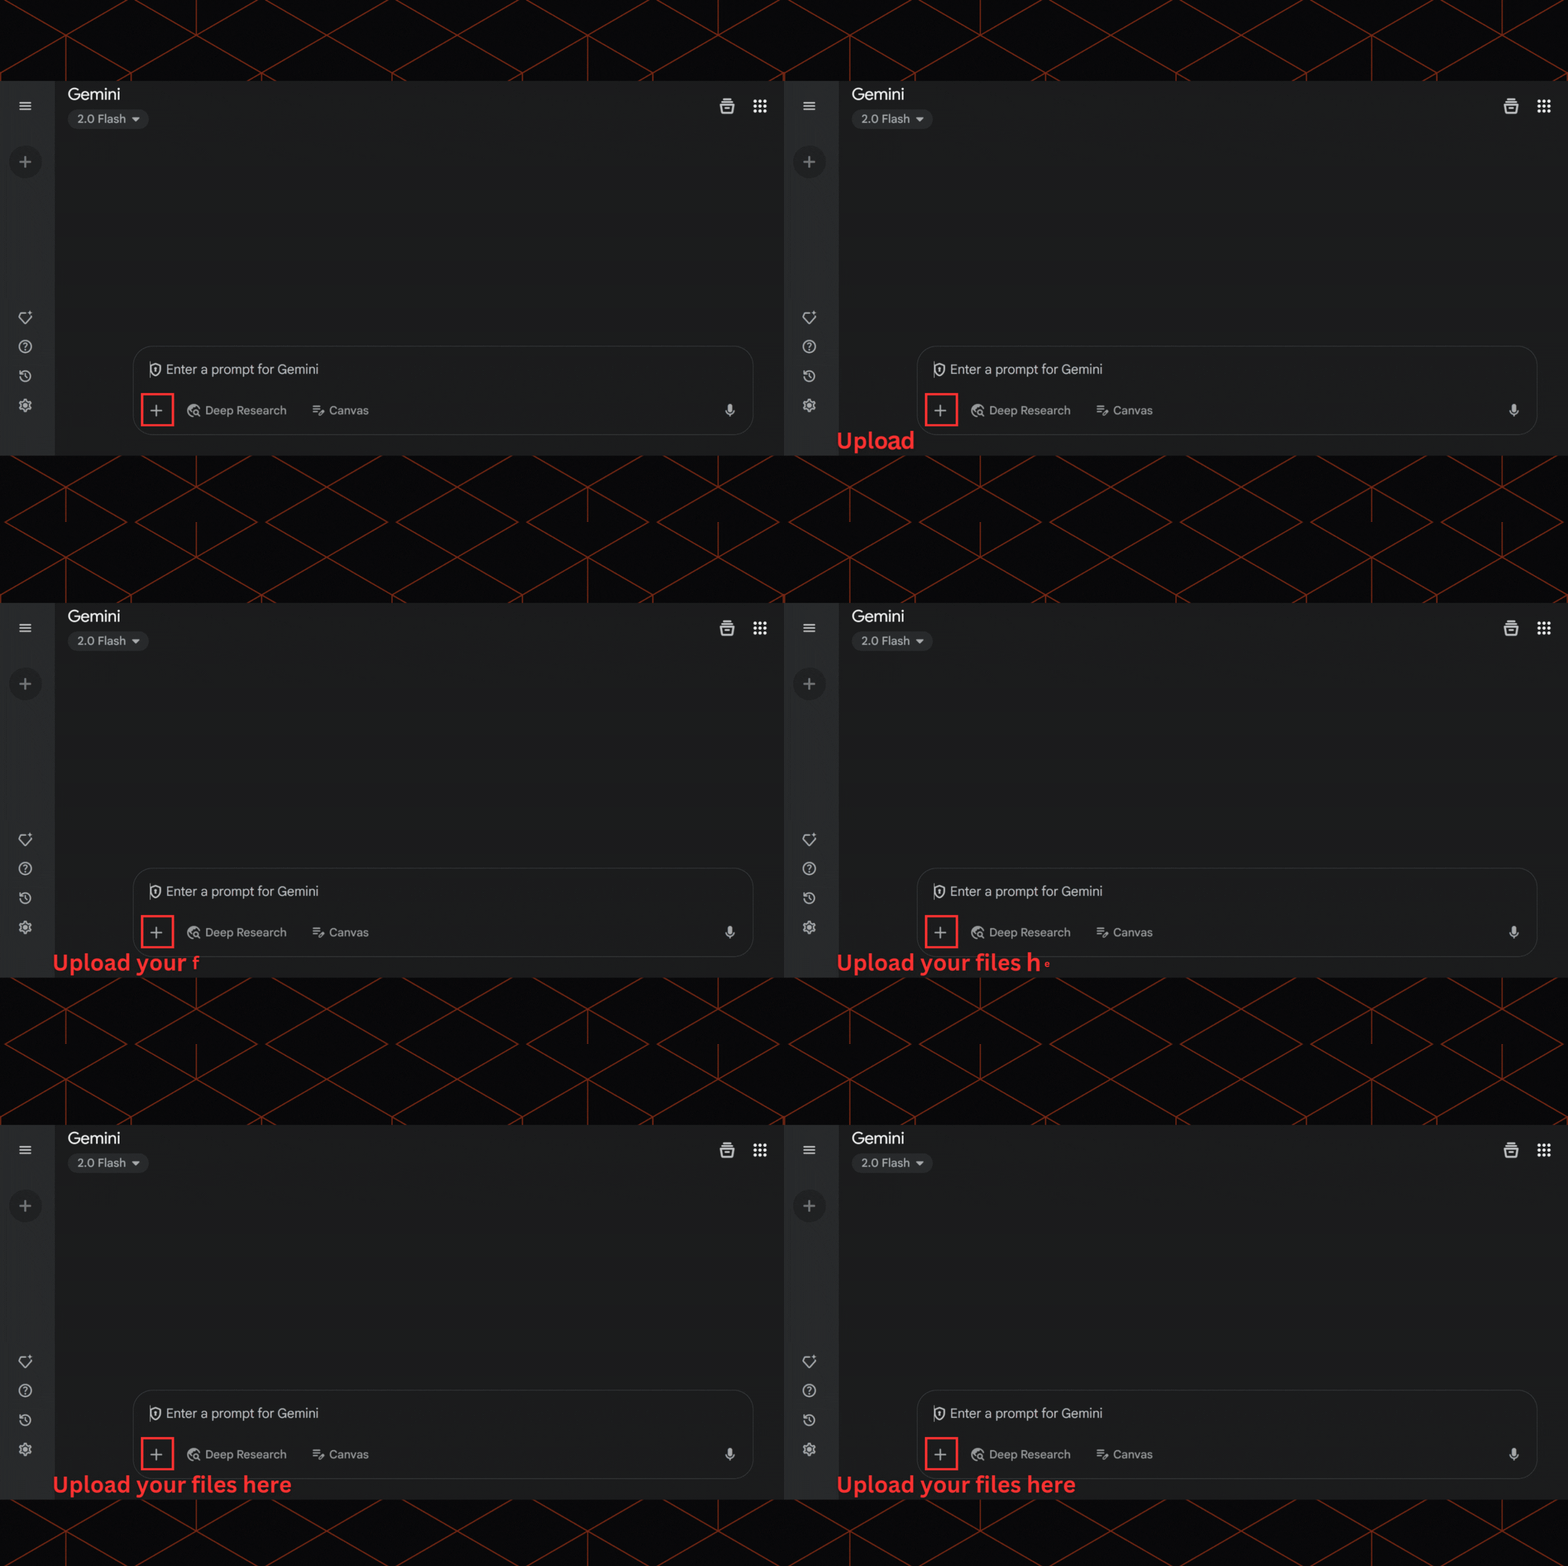
To try its ‘upload files’ feature, click the (+) icon near the message box and upload the desired file. It can be anything—a document, screenshots, or even images. Gemini can extract information, interpret data, and even summarize.
If you are on your free trial, using the Gemini 2.0 Flash model, you can upload files and even perform basic analysis. But, it supports limited file formats such as PNG, JPG, TXT and DOCX, and PDF,
While uploading, remember that it can be a little patchy for some files. As of yet, there is no option to drag and drop.
4. Try its built-in tools
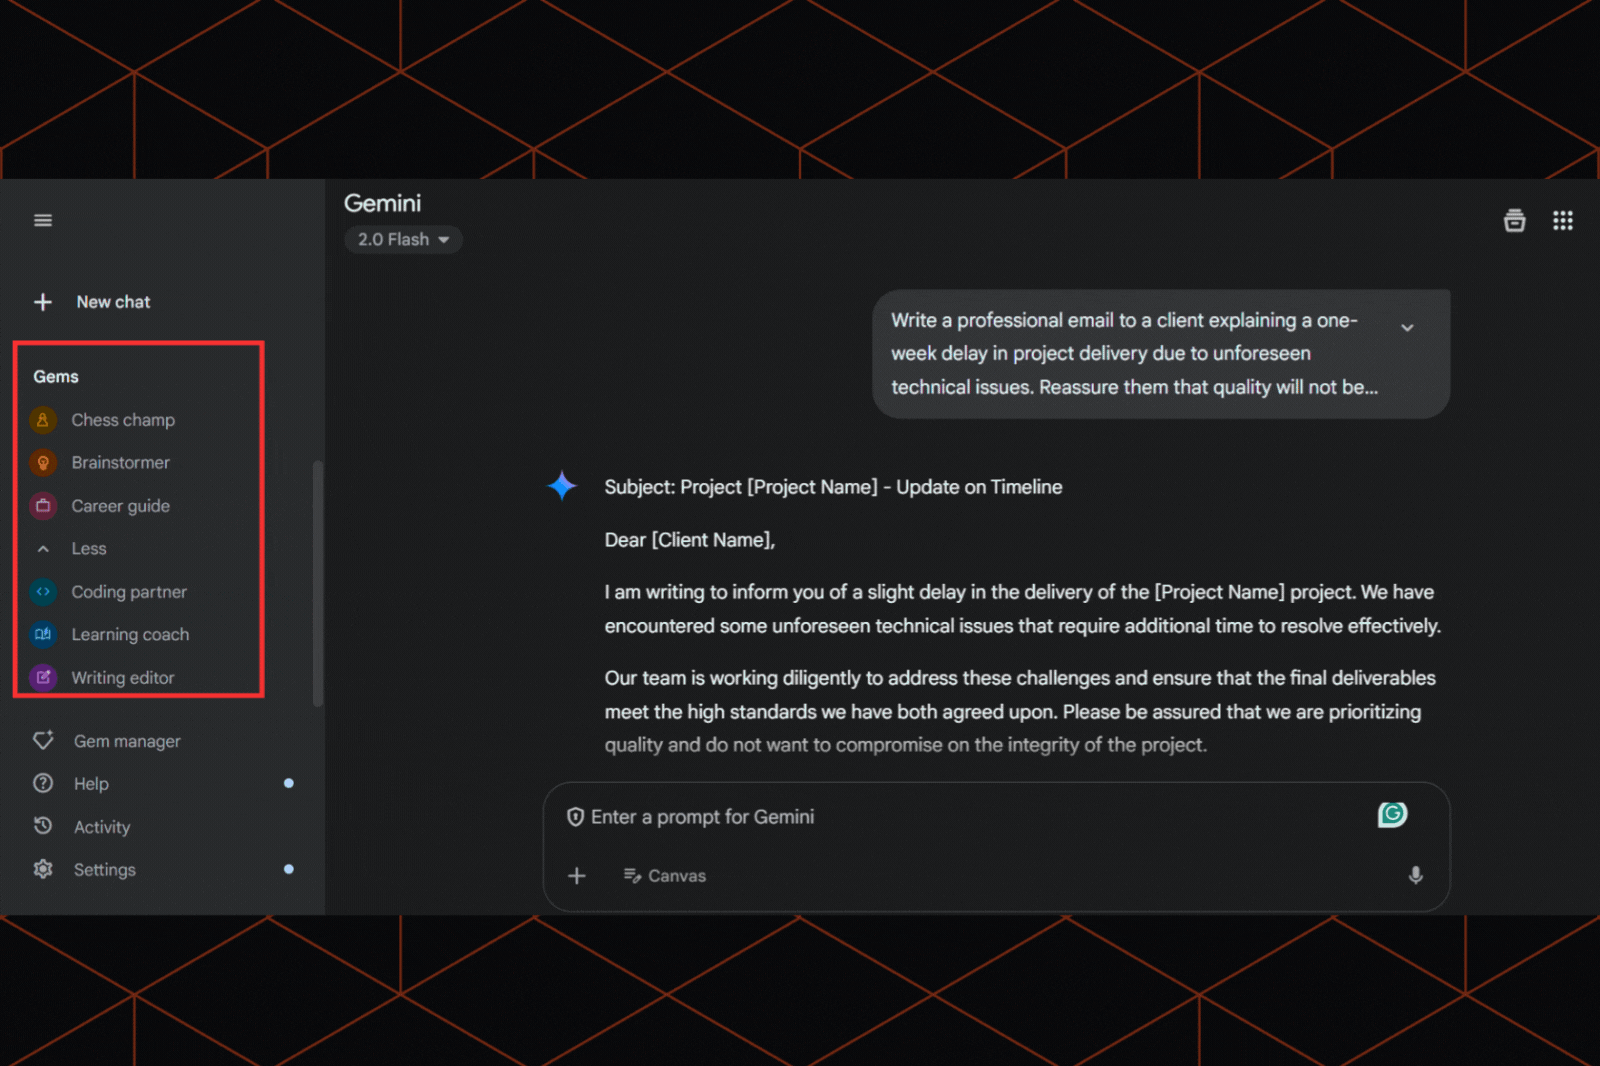
The web version of Gemini offers many built-in tools for generating code, writing, spreadsheet formulas, and a lot more. You can use these by writing a detailed prompt and activating it instantly.
Remember, features like spreadsheet integration or code previews may not be as seamless as other tools (they are still evolving). If you are on your free trial, you may not be able to access it and handle some complex tasks.
5. Review and manage your chats
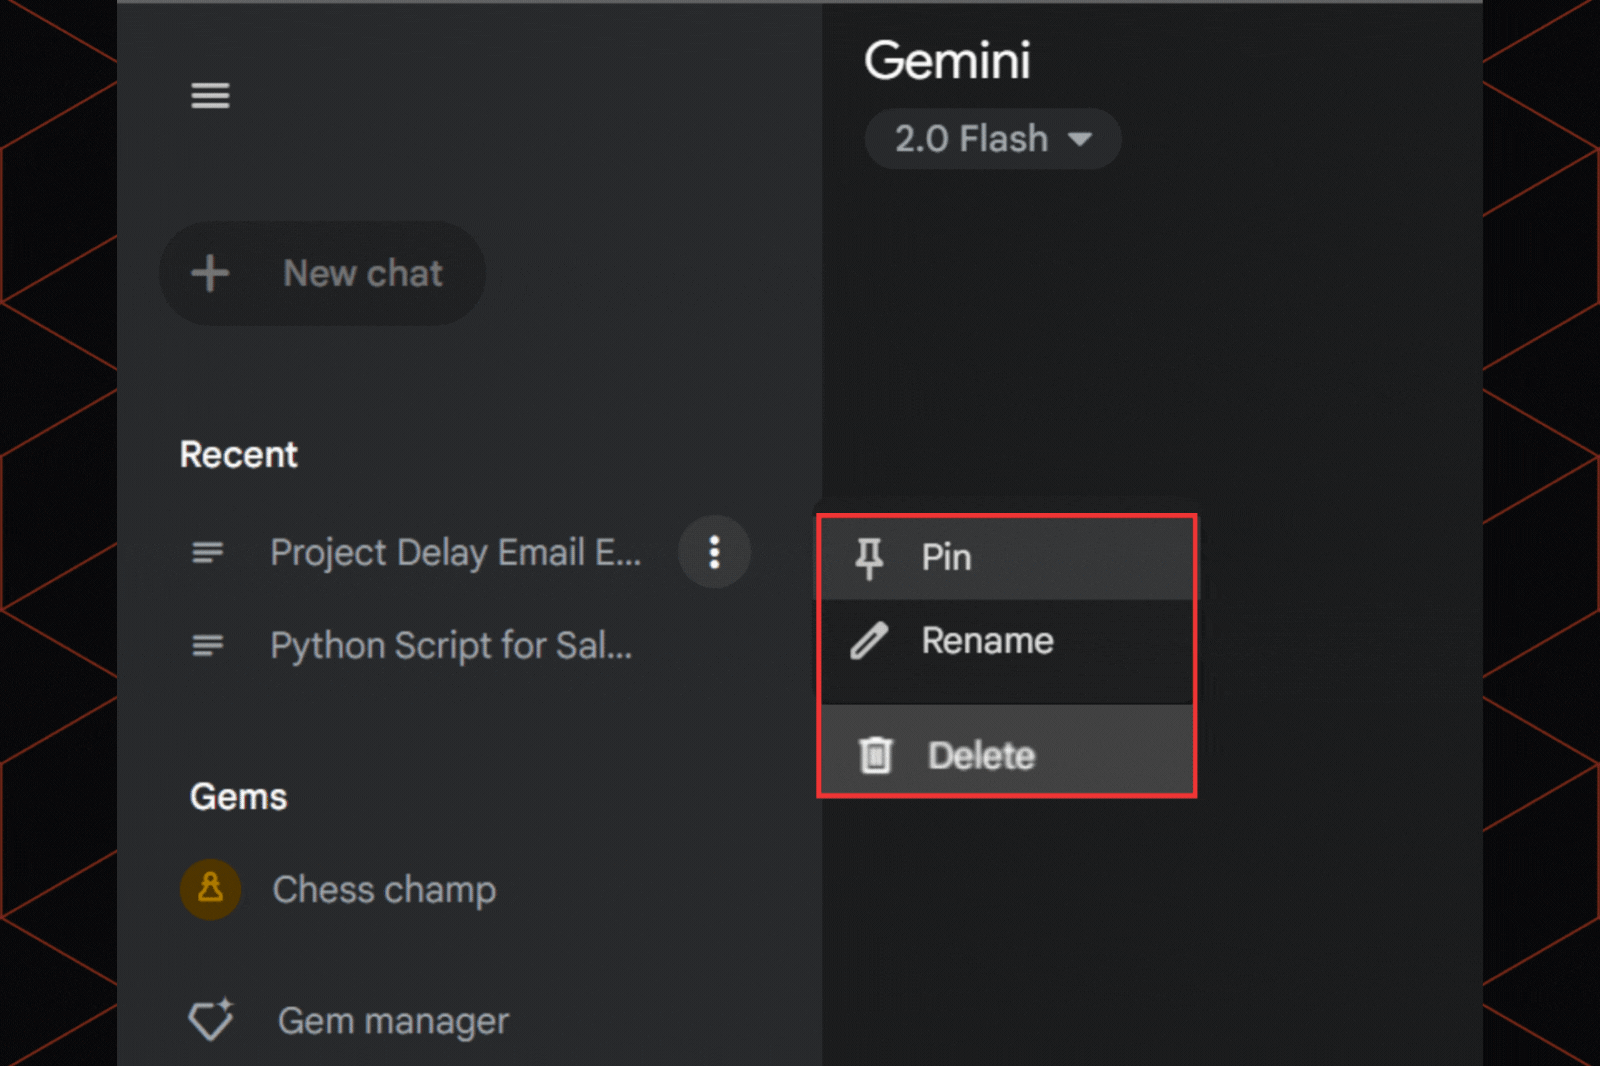
You can access the past chats in the sidebar. Gemini offers you an option to save, delete, or revisit them. If you are more concerned about your privacy, you can quickly manage your activity in the settings of your Google account. But I noticed that we cannot manage the privacy of long-term projects seamlessly. This is because it does not have a native folder or a tagging system yet.
How to access Gemini via Chrome?
After I recently tried accessing Gemini via Chrome, I have compiled the steps for you:
1. Type @gemini directly in the Chrome address bar
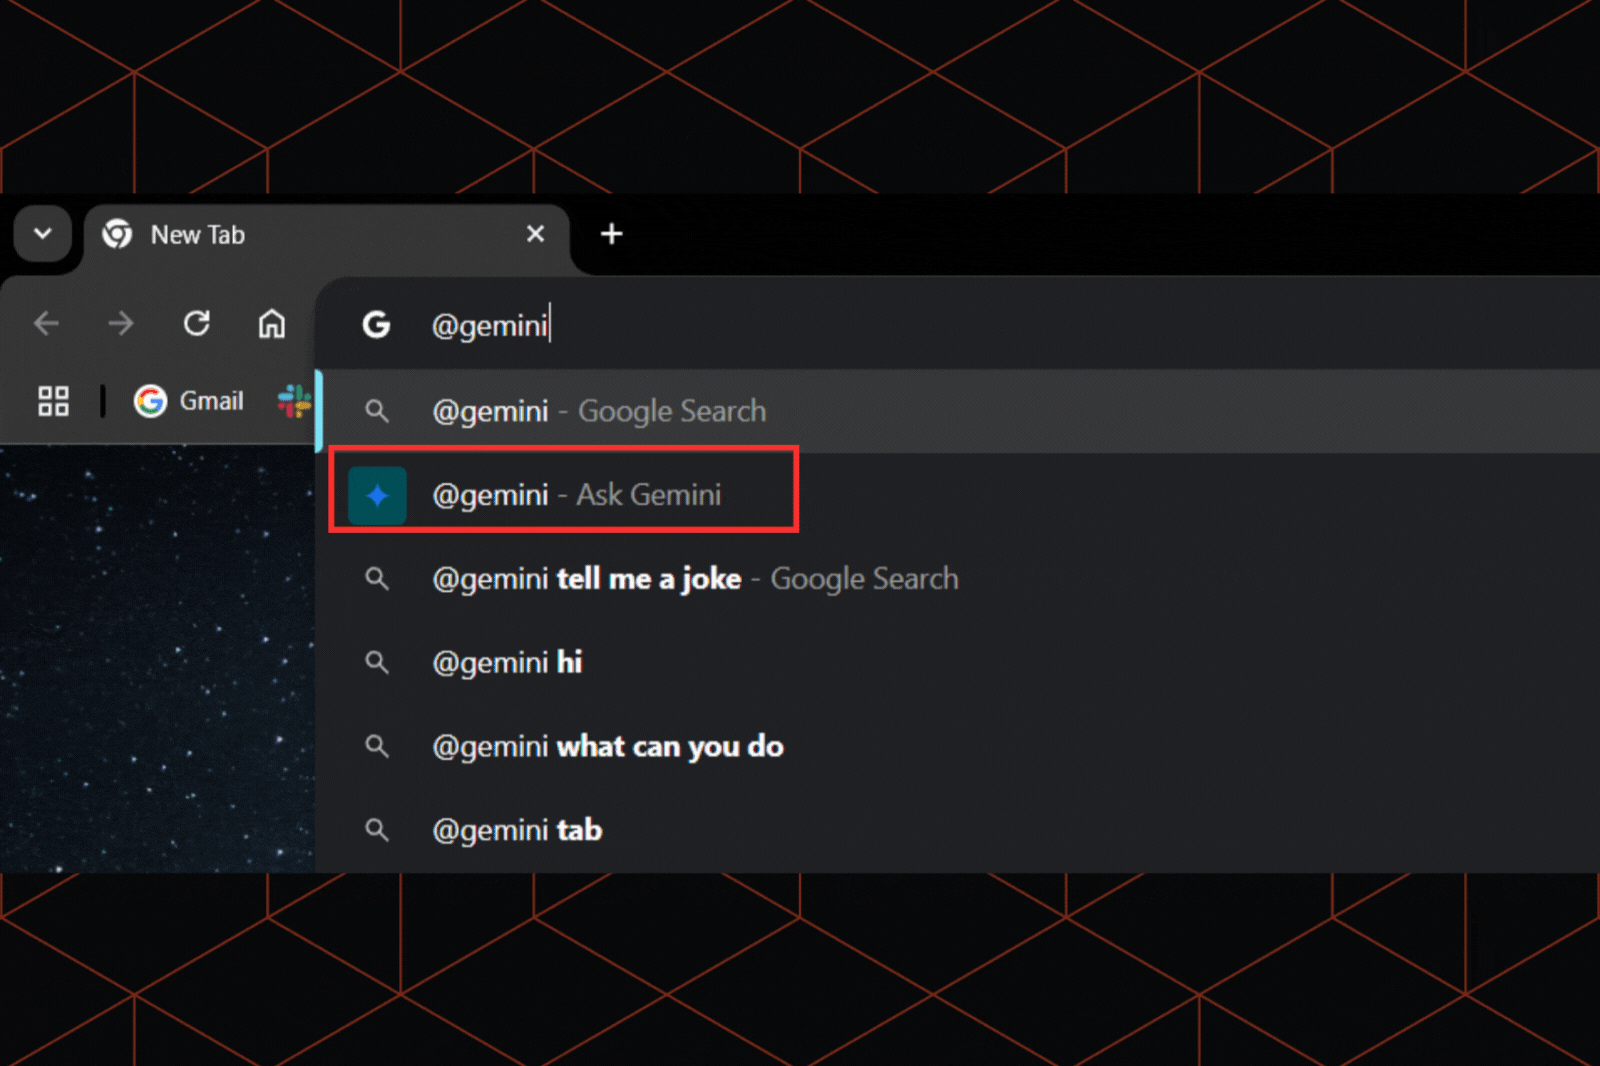
Simply type @gemini in your Chrome address bar and click ‘Chat with Gemini’. This will directly redirect you to gemini.google.com with an auto-filled prompt. This is the easiest way I could find to get started.
After experimenting with it, I understood that Gemini does not automatically access or understand your current page’s content or tab’s context without any manual input. So, for webpage-related assistance, manual input is essential.
2. Add the Gemini extension
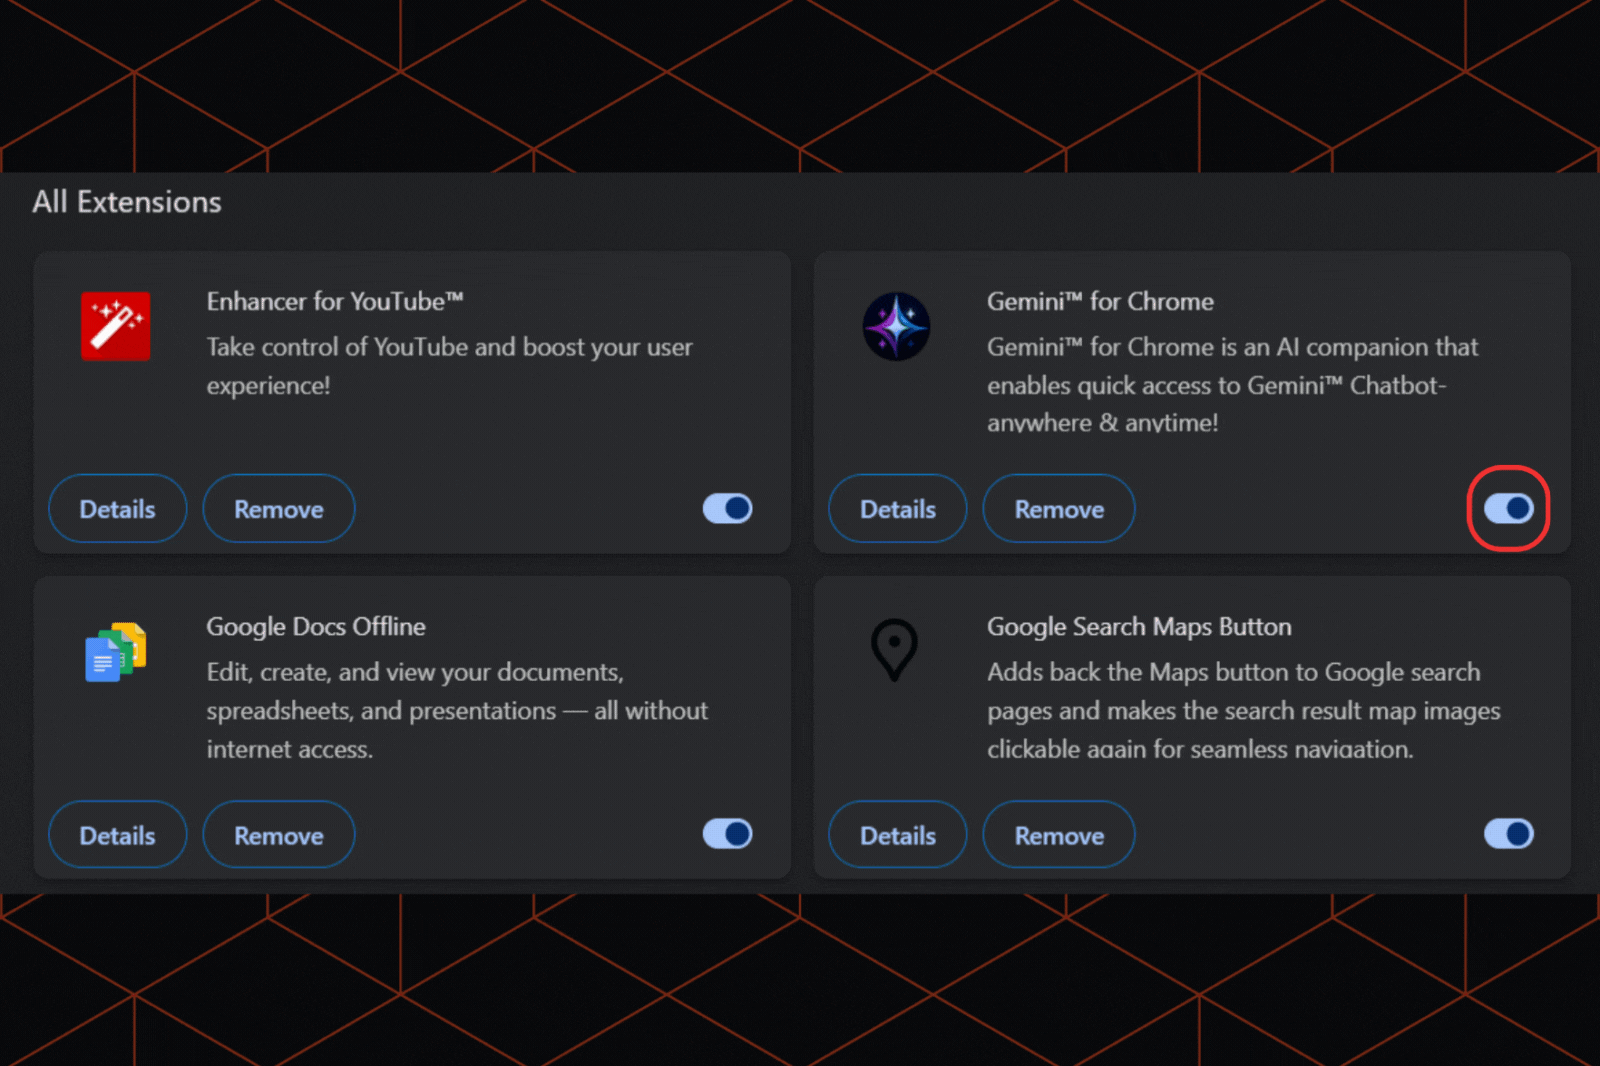
Add the Gemini extension from the Chrome Web Store. Once you add it, you can see the Gemini icon on your toolbar. Click on it and you will see a sidebar where you can flexibly chat without distracting from your current tab.
While it offers convenience this way, the sidebar allows access to basic features. Actions like uploading a file or writing a summary (using Google Docs) may ask you to use its full-page web interface.
This way, you need to balance your tasks smartly.
3. Get AI features in Chrome Settings
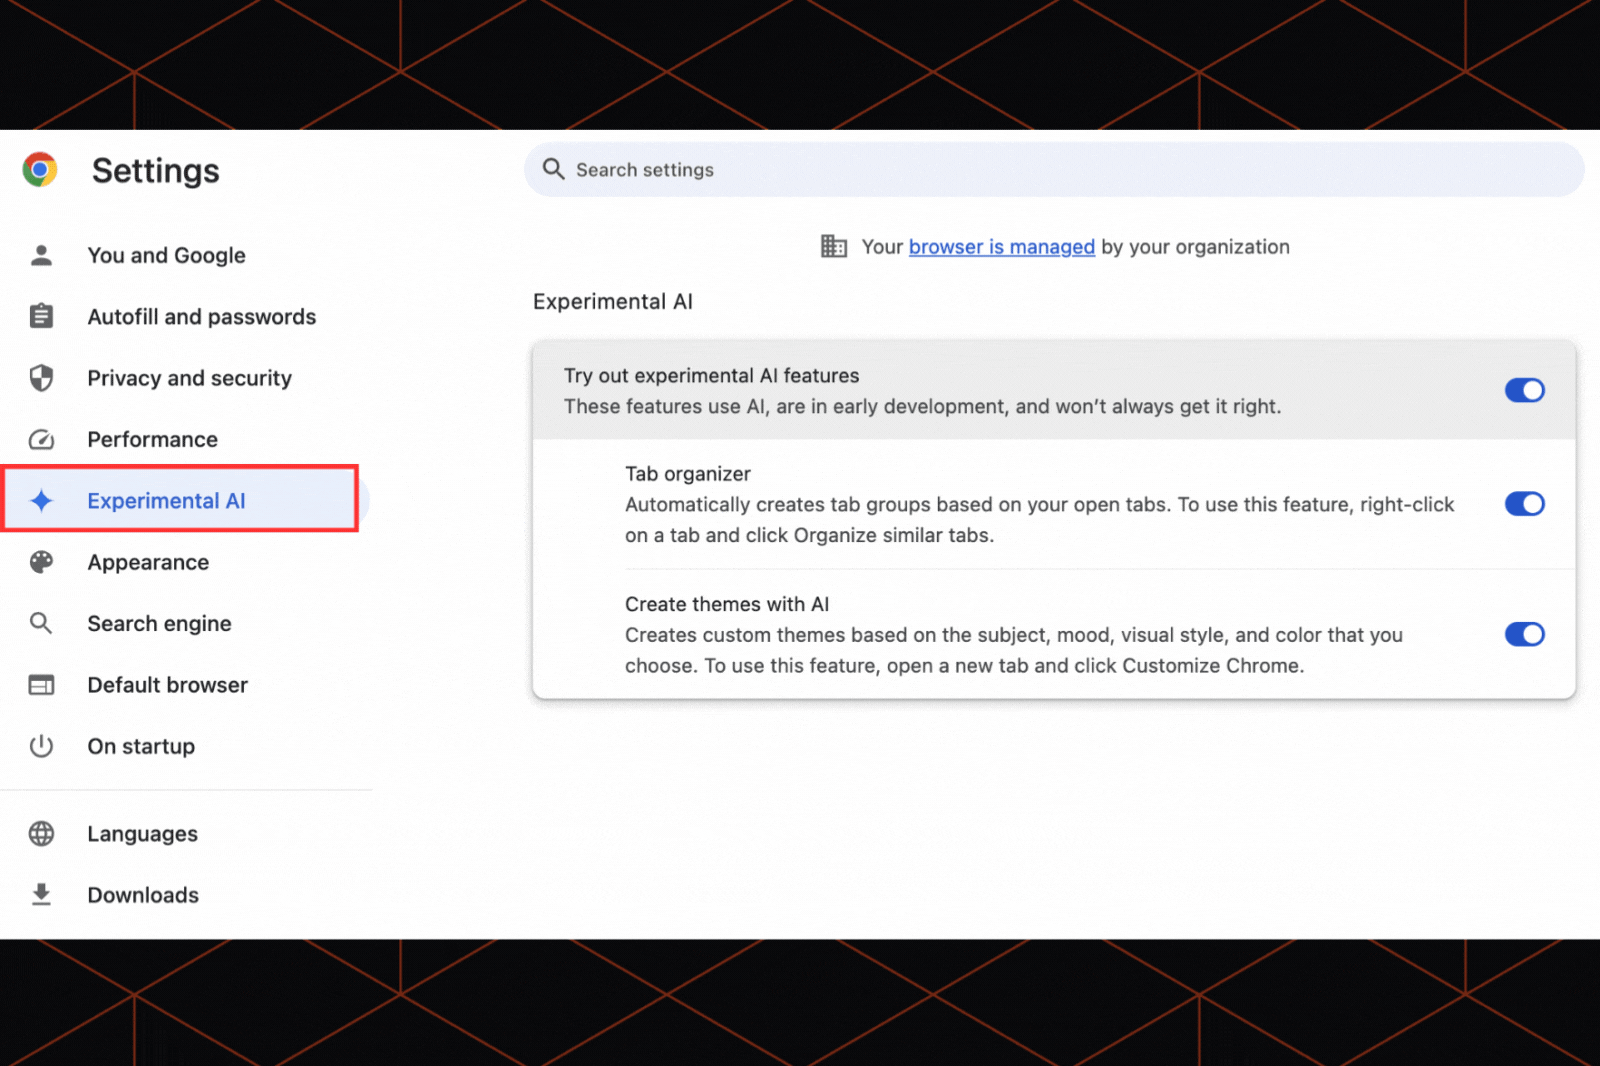
Google automatically selects the AI model, depending on the context and the task you are working on. If you want to manually select the AI models, you need to login to its web application and choose from the available options such as Gemini Pro, Flash and Nano.
Still, you can personalize your AI settings. To do so, you need to visit the Gemini web application’s settings. This is completely optional and requires your consent.
Some AI features are still in experimental mode and may not be available to all users. So, it may require a supported Gemini Advanced plan or a Google Workspace account.
How to Access Gemini in Google Workspace?
1. Turn on Google Gemini in your Admin console
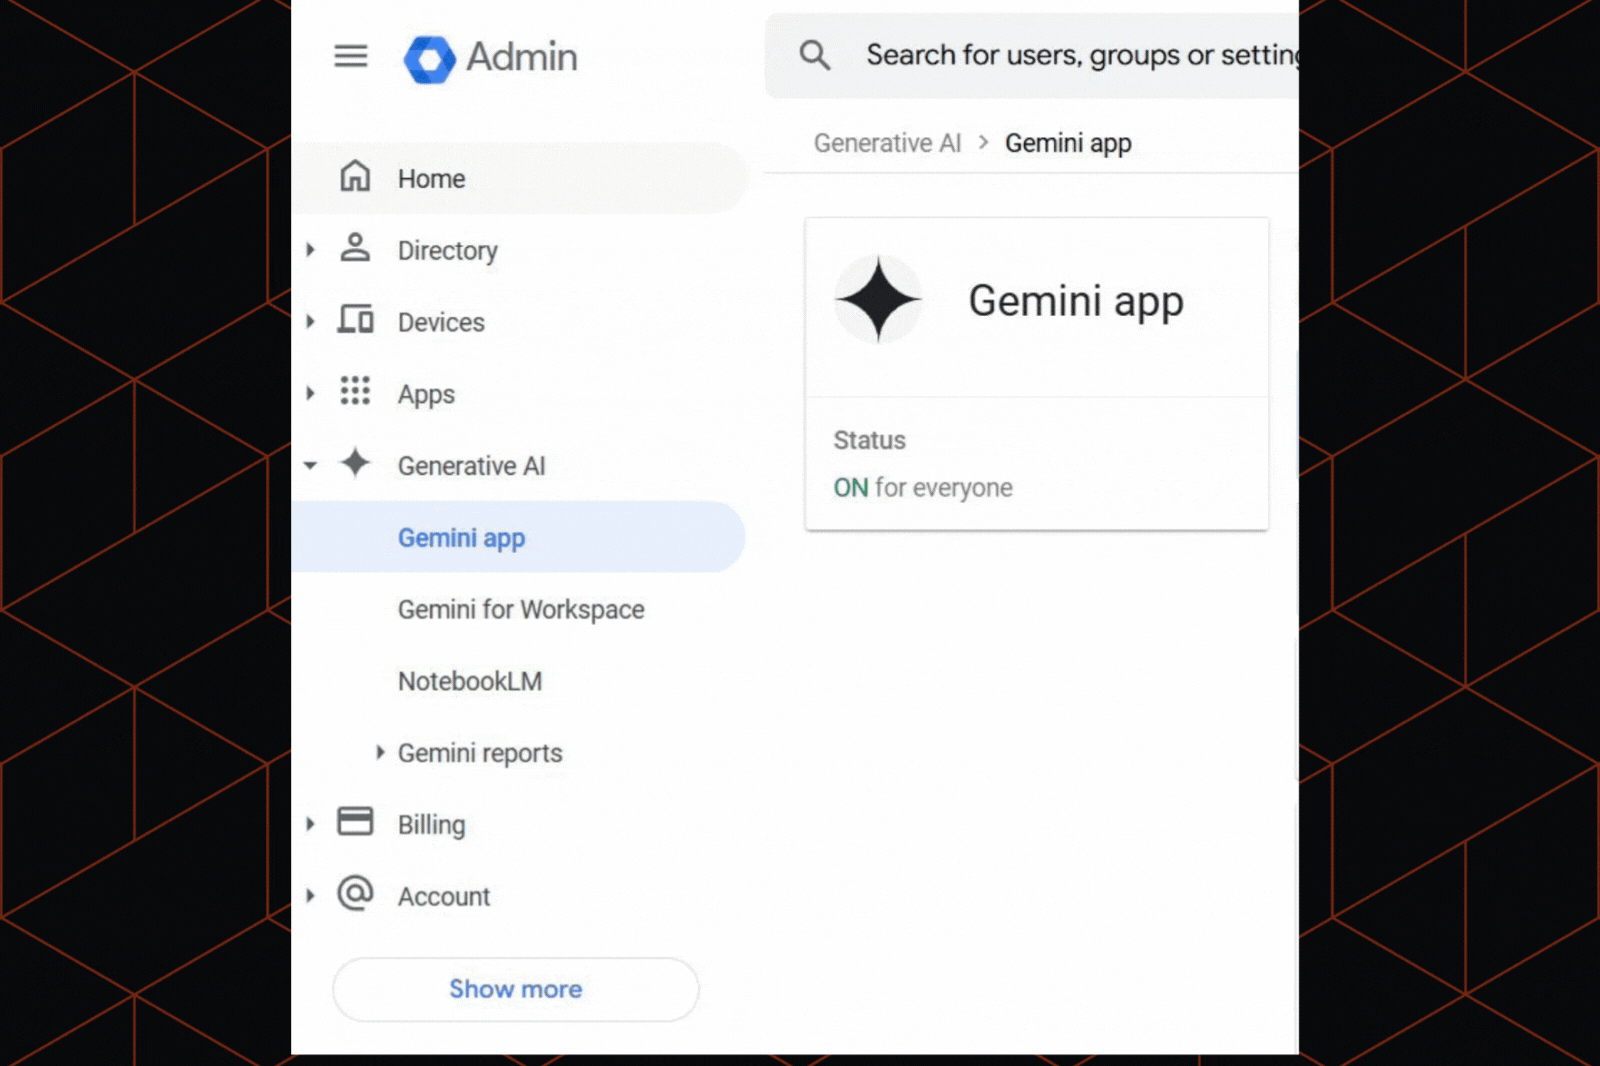
Open your Google Admin console — Apps — Google Workspace — Settings for Gemini — Turn it on. This setup was quite easy. But yes, you must know that even after it is enabled for use, it may take up to 24 hours for all users to access Gemini features across different Workspace applications. (Does not offer a license to users below the age of 18).
2. Choose your plan for Gemini
If you wish to access all of Gemini's AI capabilities, a basic Workspace plan like Business Starter is a good plan to kickstart.
You can also try its Business Standard, Business Plus, or an Enterprise plan for that. I subscribed to its Business Standard and used its core features like ‘Slide creation suggestions in Slides’, ‘Smart formula generation in Sheets’, and a lot more. These features were great for daily content-based tasks.
Later, I realized that there are some advanced tools like ‘Context-aware Smart Fill’, ‘Data Loss Prevention (DLP) integration and many other powerful tools that were only available in the Enterprise plan.
So, for client-facing workflows and compliance, we finally upgraded to its Enterprise plan and got access to its advanced features.
To try it out, you can look for its 14-day free trial and see if it adds value to your workflow. This free trial is available for all plans, except the Enterprise plan.
Here’s the pricing of all Google Workspace plans:
Business Starter - $7 per user/month, 1-year commitment
Business Standard - $14 per user/month, 1-year commitment
Business Plus - $22 per user/month, 1-year commitment
Enterprise Plan - Custom pricing
3. Use Gemini directly on Workspace apps (Gmail, Docs, Sheets, Slides, Meet)
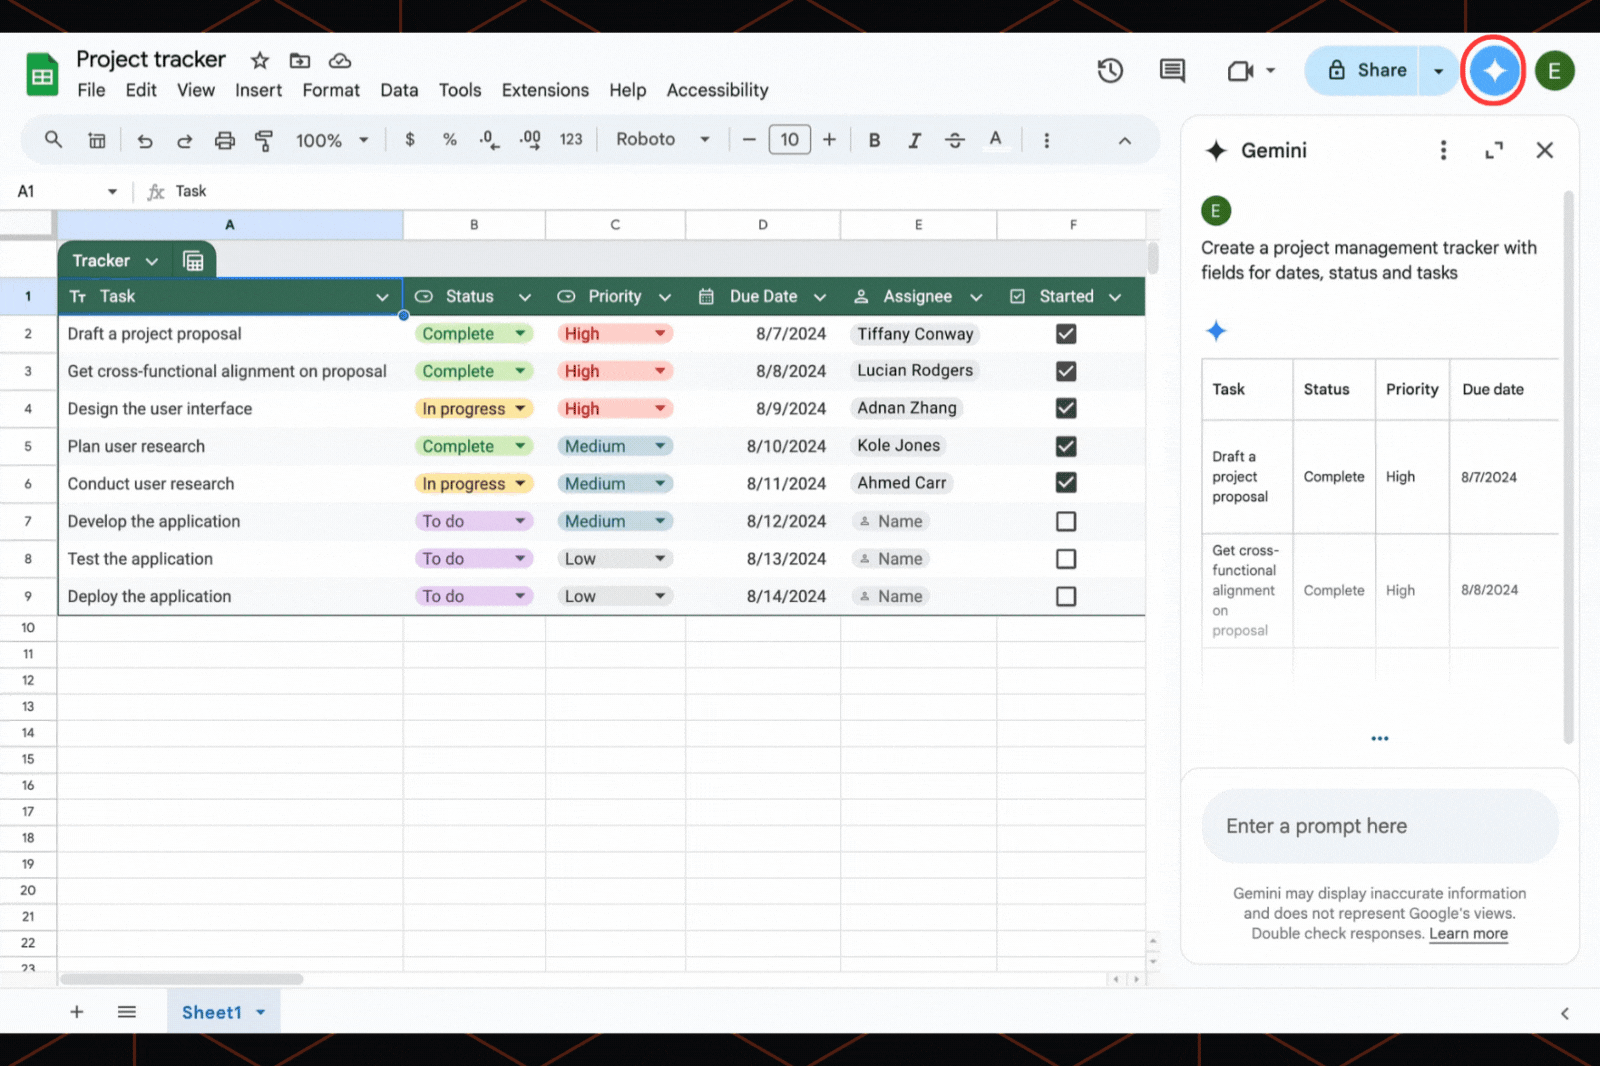
Once you activate one of the paid plans, Gemini will show up inside your different Workspace applications. It instantly showed me ‘Help me write’ while writing emails in Gmail, and when I switched to the Sheets tab, it showed me ‘Help me organize. This appeared naturally in all such Workspace applications.
While using it, I noticed that its speed gets affected during the heavy traffic times, particularly when they are working with extended interactions or large datasets. Sometimes, it even lags in Google Sheets when dealing with heavy data. But it's not consistent and depends on factors like internet connection, server load, and app version.
4. Access Gemini applications for better assistance
For smart features, you need to use its application. I tried its ‘smart notes’ feature in Google Meet. This worked effectively and saved us ample time to address the client's needs promptly.
While some features can work offline, those offering real-time solutions like meeting summaries need a stable and high-speed connection. Otherwise, it won’t be worth using it.
5. Manage admin controls for protecting data
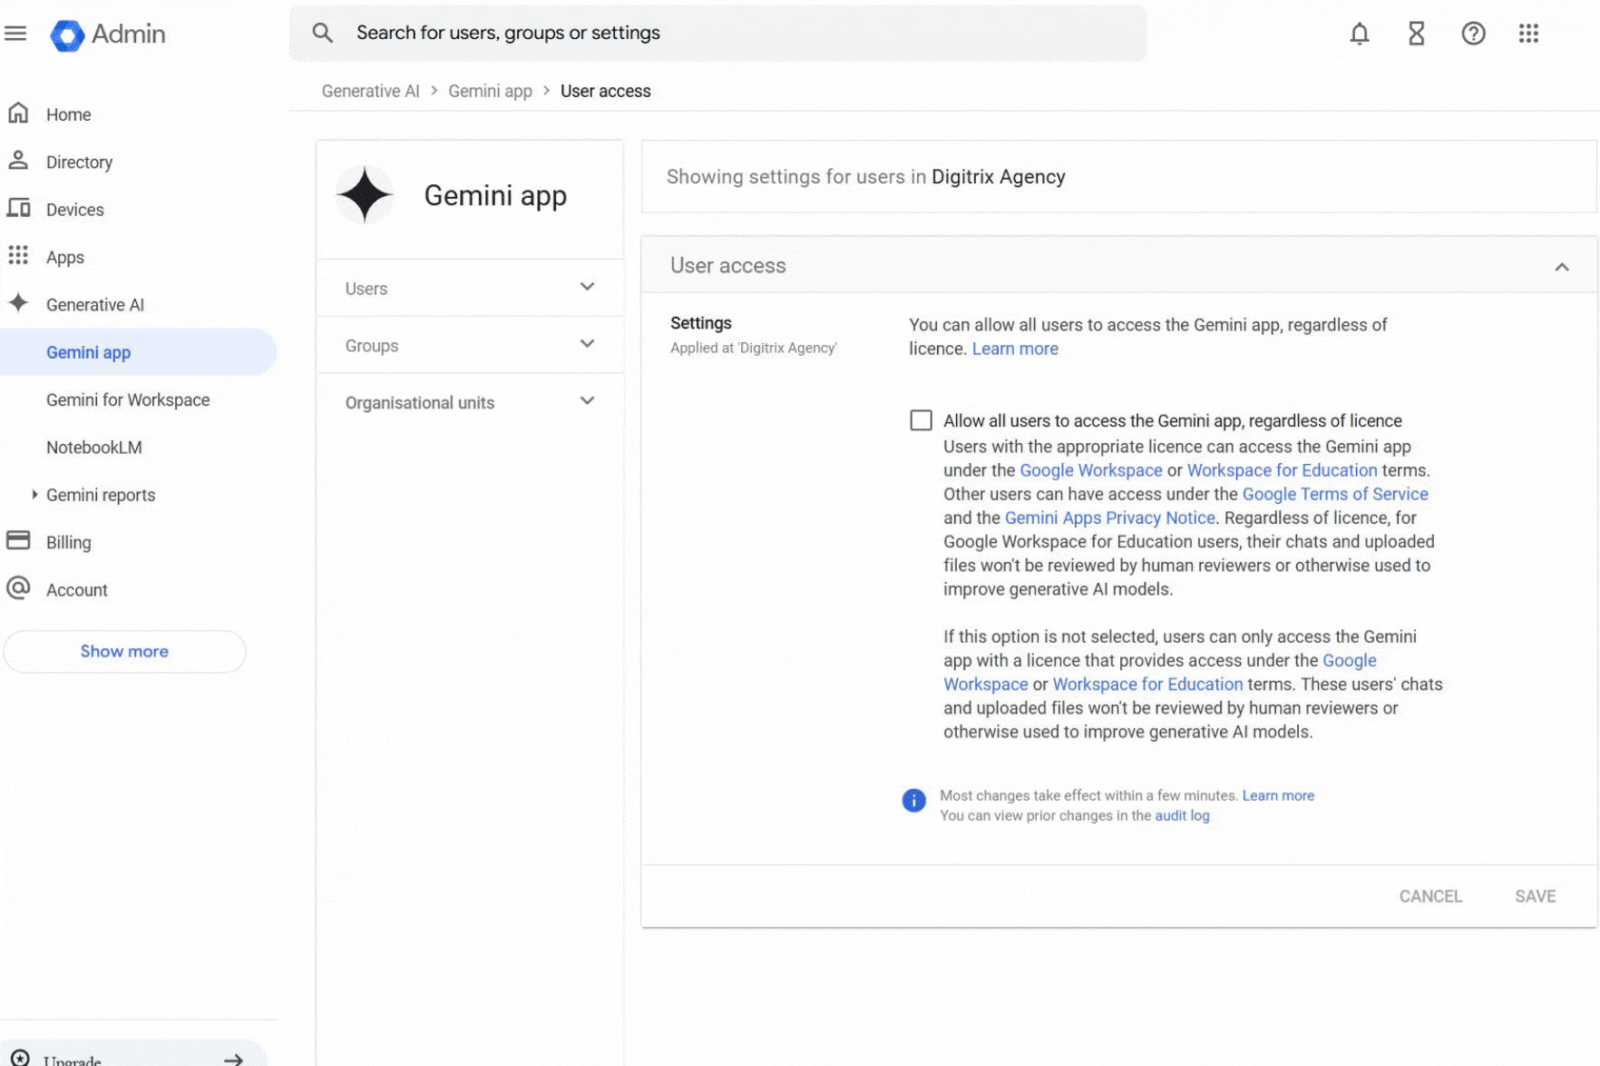
As per your requirements, being an admin, you need to customize privacy settings, restrict AI memory, and even control what Gemini can access. This helped us to protect our docs and slides that have sensitive data.
No doubt, some controls, such as external data sharing restrictions, are helpful, as compared to enterprise-based AI tools, but it felt a bit basic. So, for security reasons, we had to make solid internal company policies.
How to use Gemini on mobile devices?
We tested Google Gemini both on Android and iPhone. After downloading the application, features like Canvas, Live Mode, and Deep Research were nonetheless smooth on both mobile devices (Remember, these features are available for limited usage in a free version). Here are the steps:
How to use Gemini on Android?
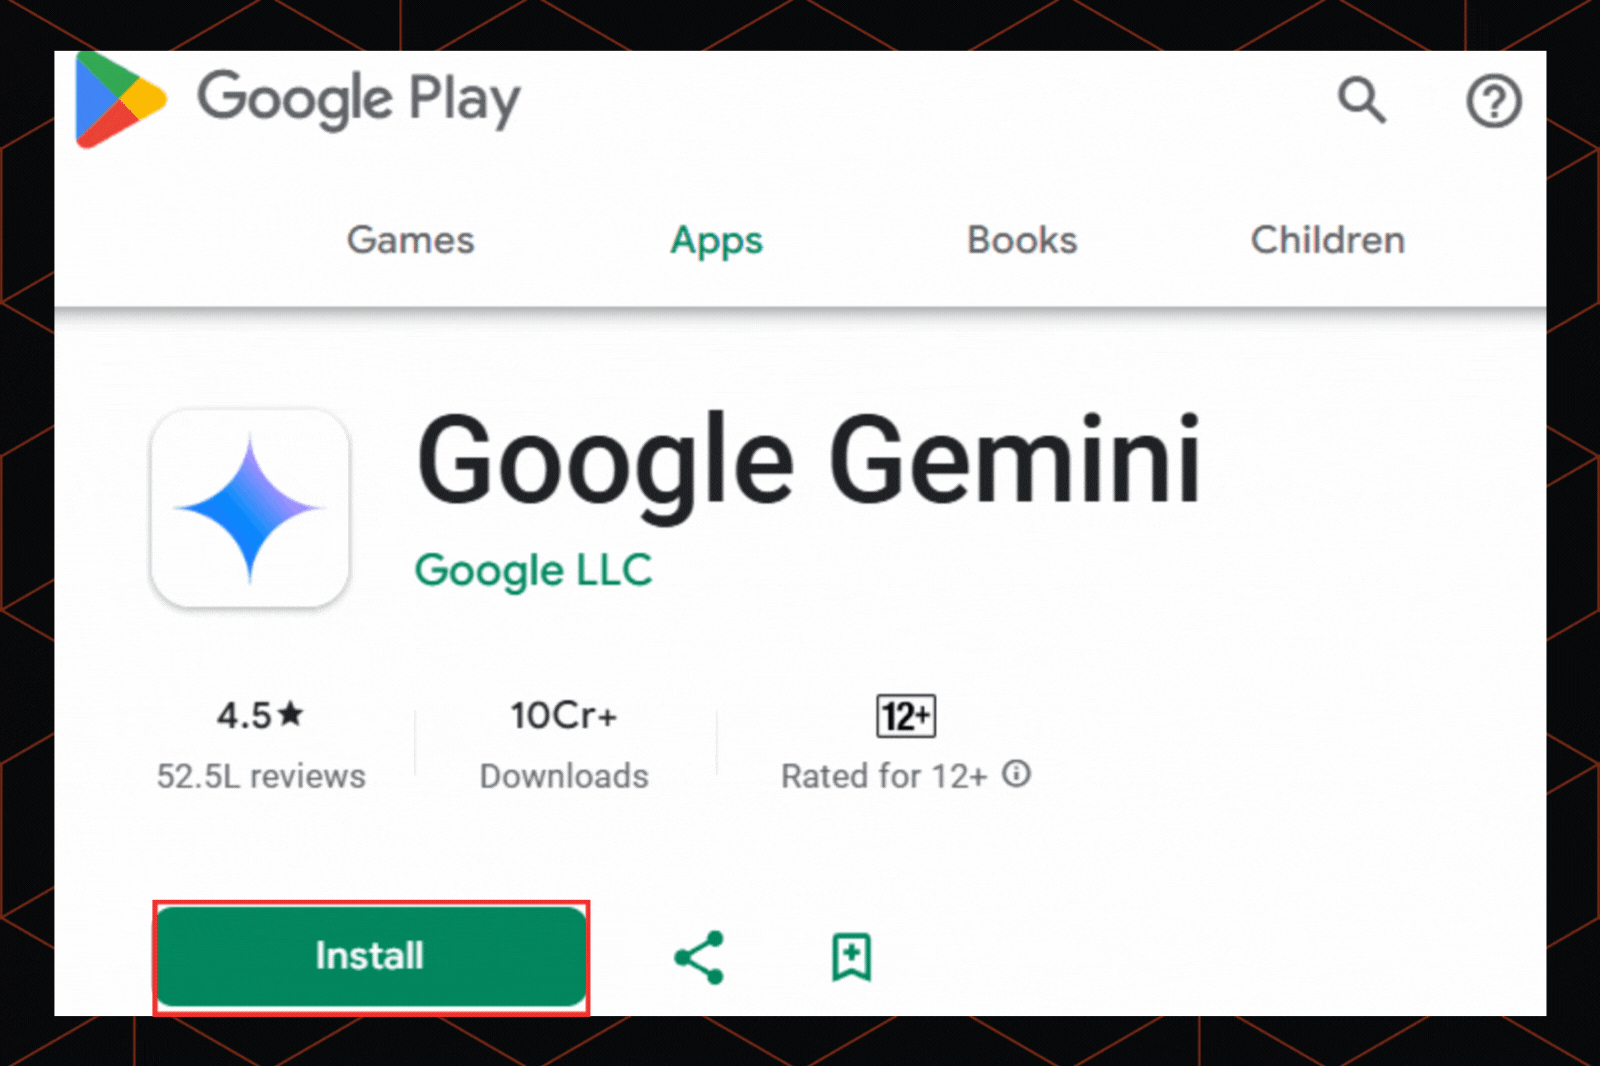
1. Download and install the Google Gemini app from the Google Play Store.
2. Start the conversation. You can either type your prompt or tap the microphone to enable voice-to-text response. If you are opting for that, make sure you have a strong data connection.
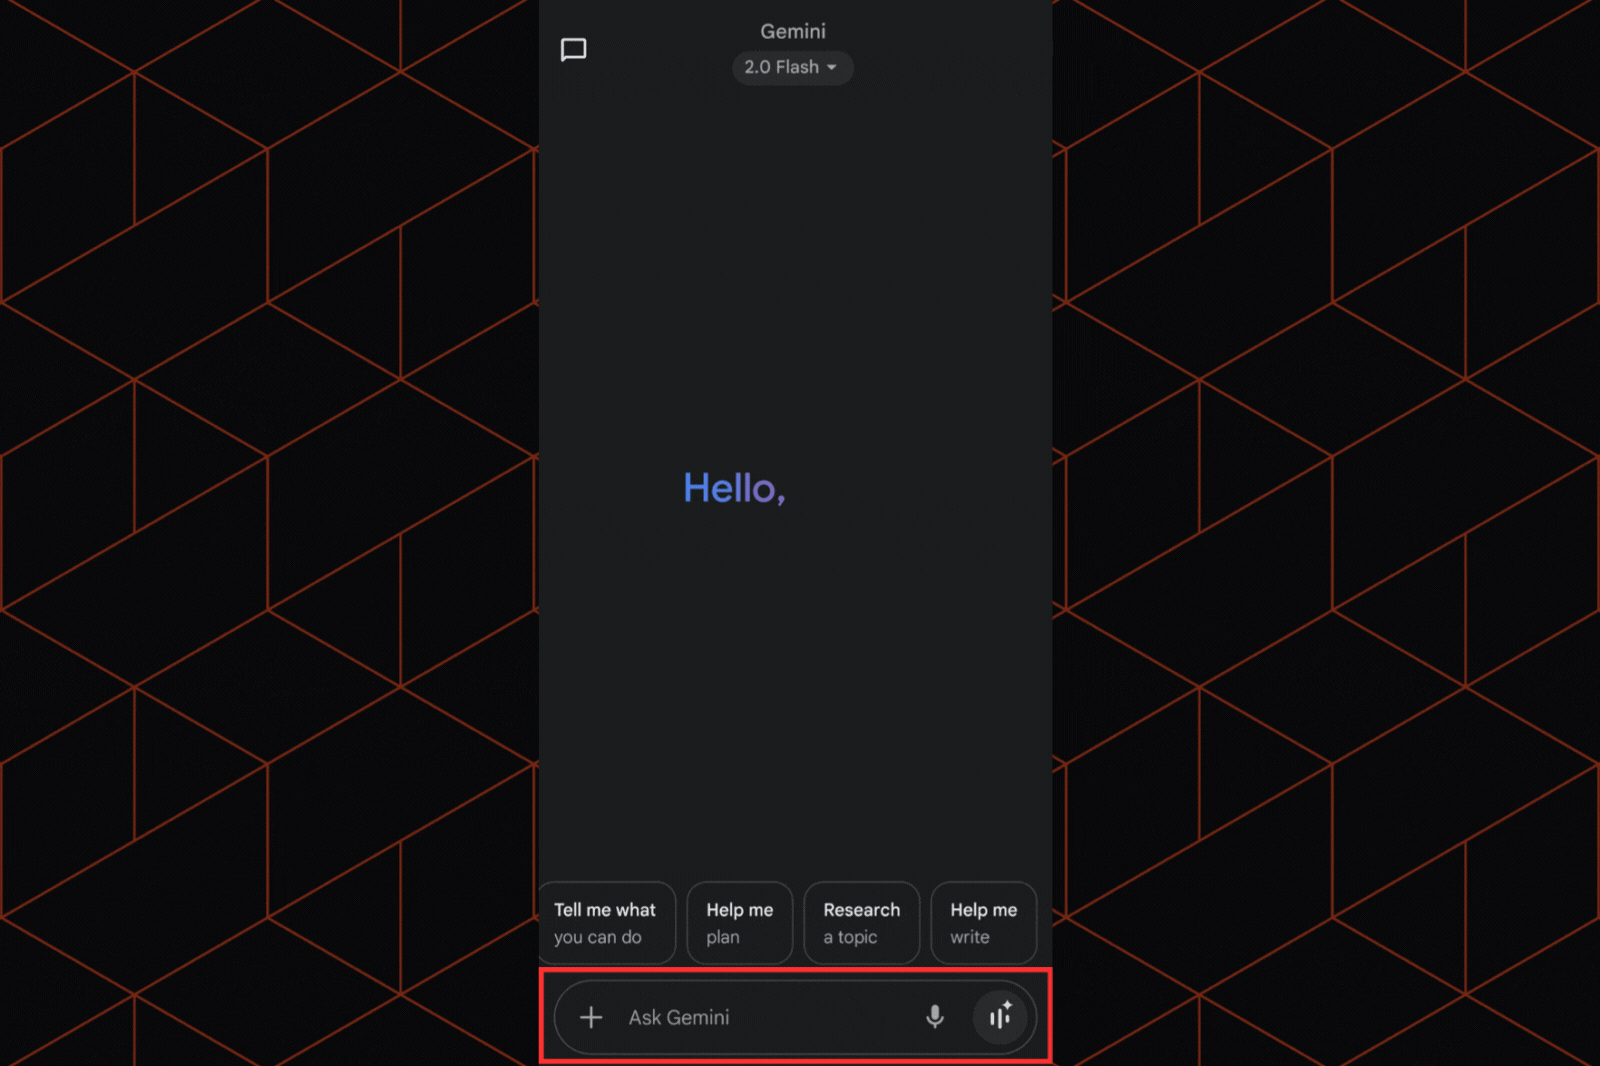
3. Tap the ‘Live Button’ (looks like a glowing star sitting on three small pillars) for voice-based real-time conversations. This feature can lag slightly during peak hours (available only with a Gemini Advanced plan).

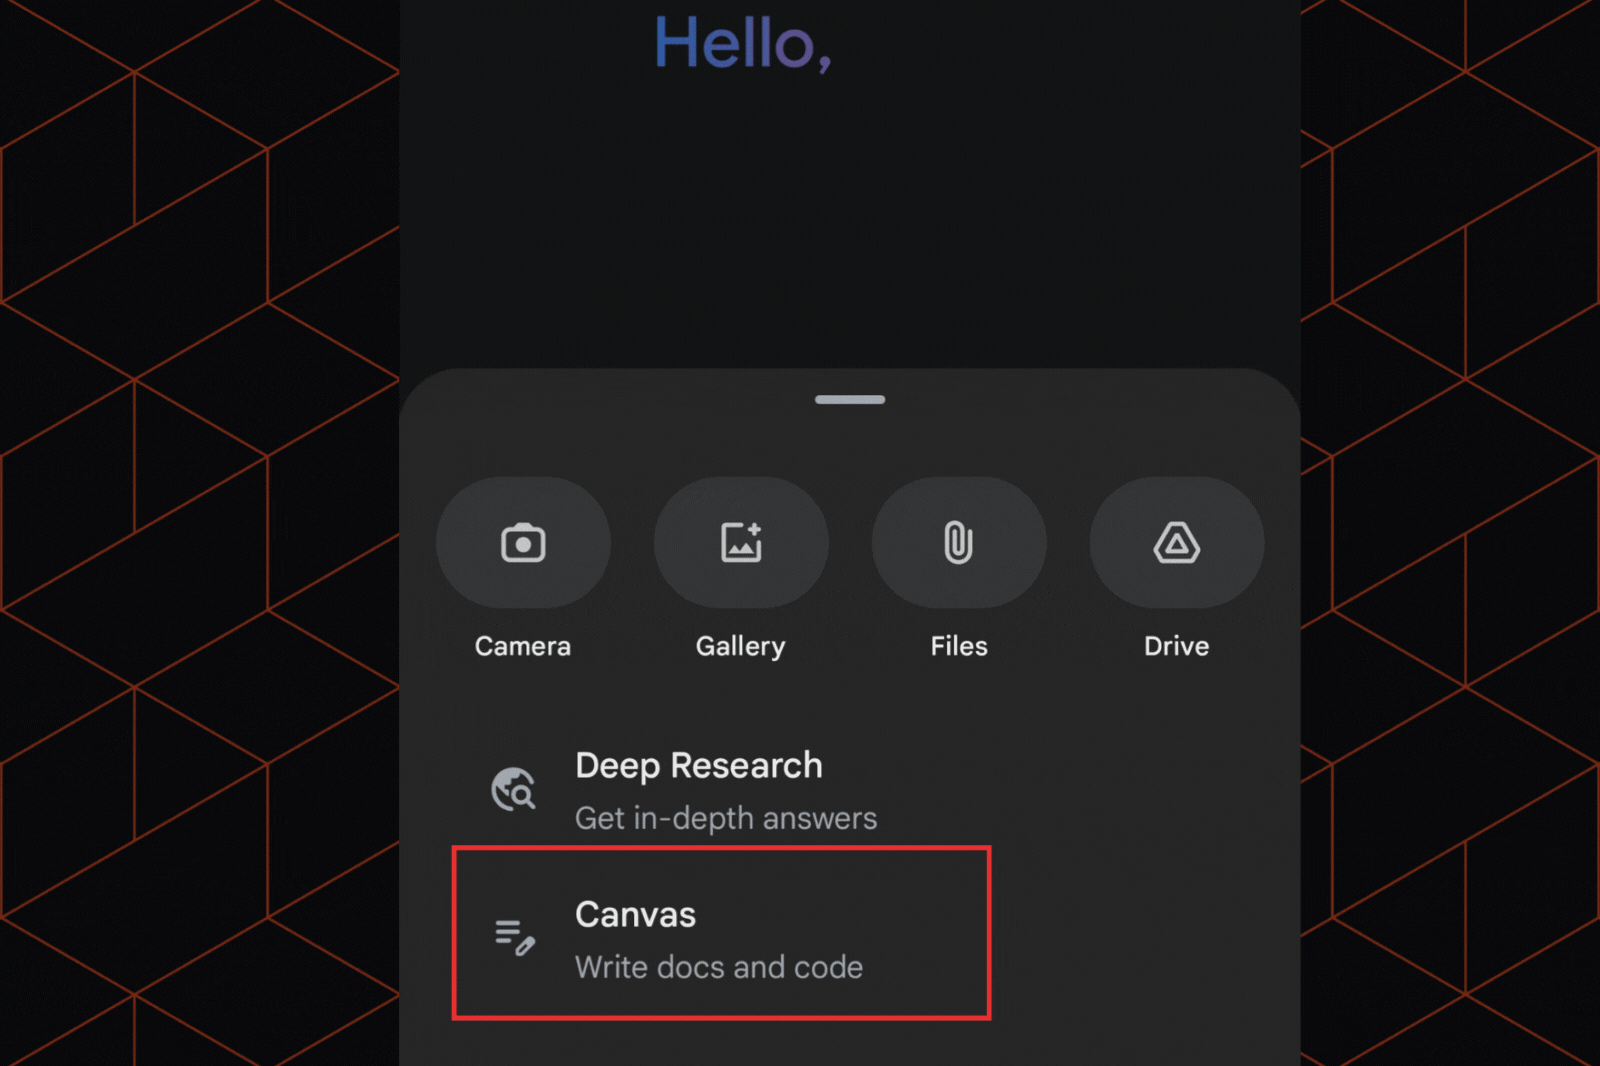
4. Upload images/files by tapping on (+) and selecting the desired one from your media. For advanced features like file analysis or full-screen sharing options, subscription to the Gemini Advanced plan is required.
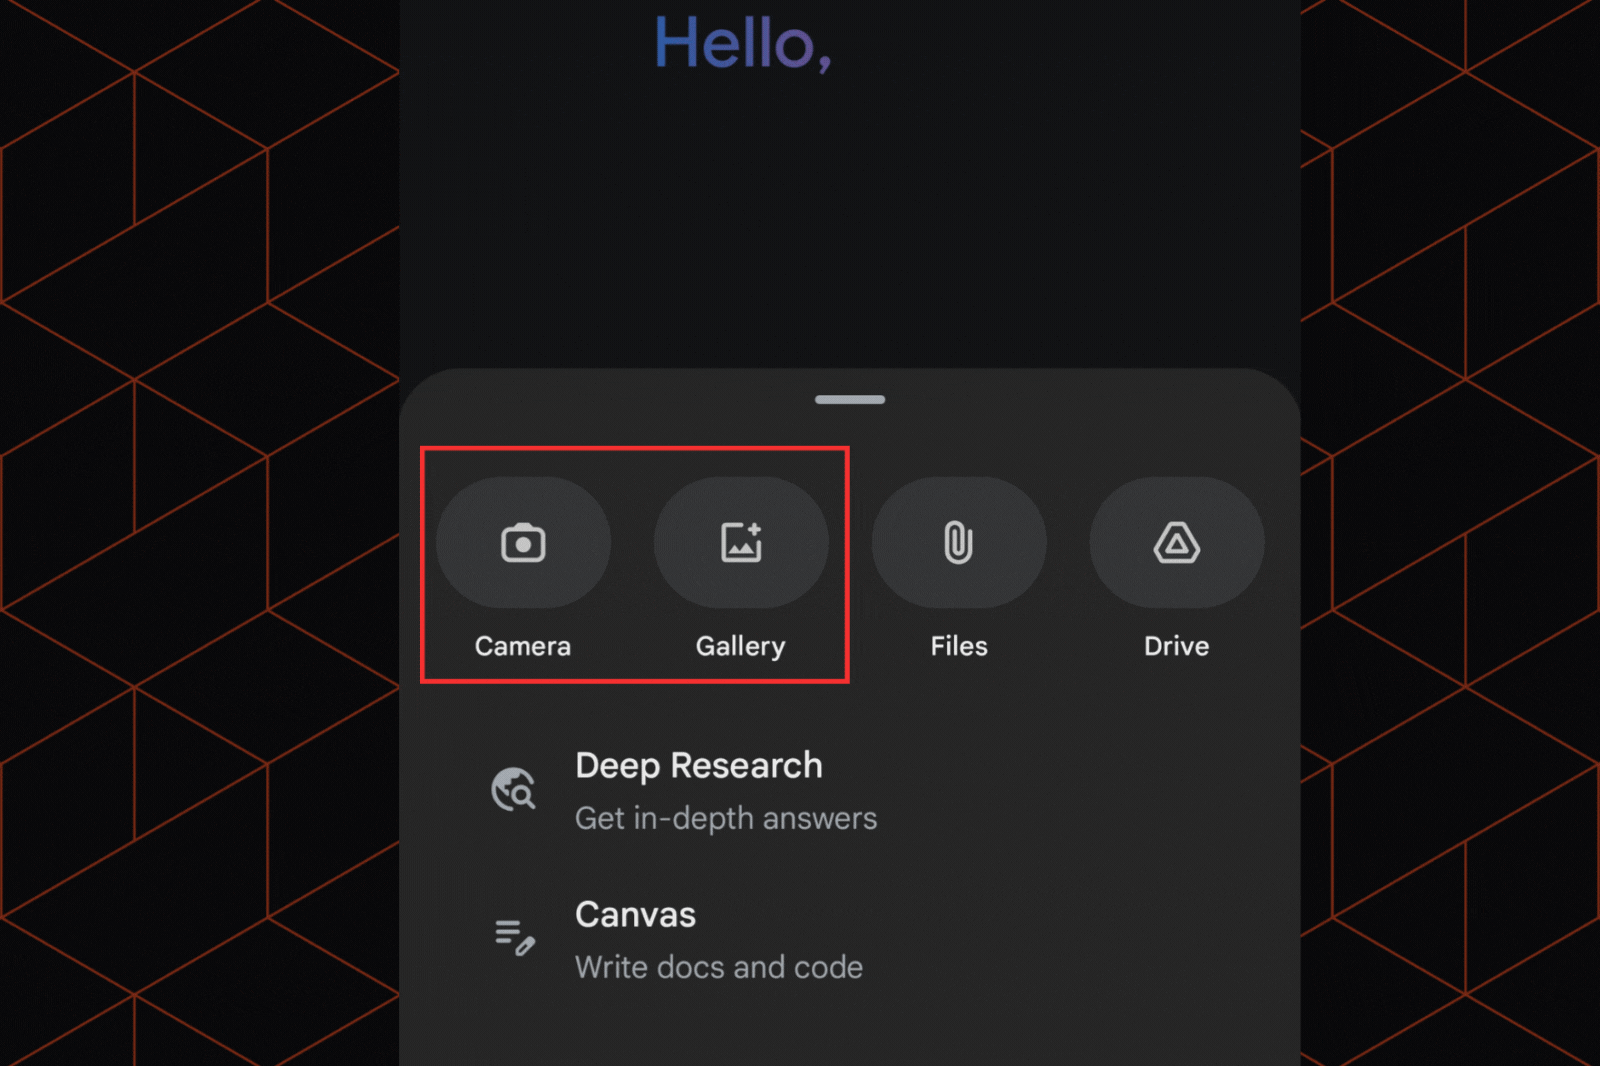
5. For better and more in-depth research, you can use its ‘Deep Research’ feature to begin by writing a detailed prompt.
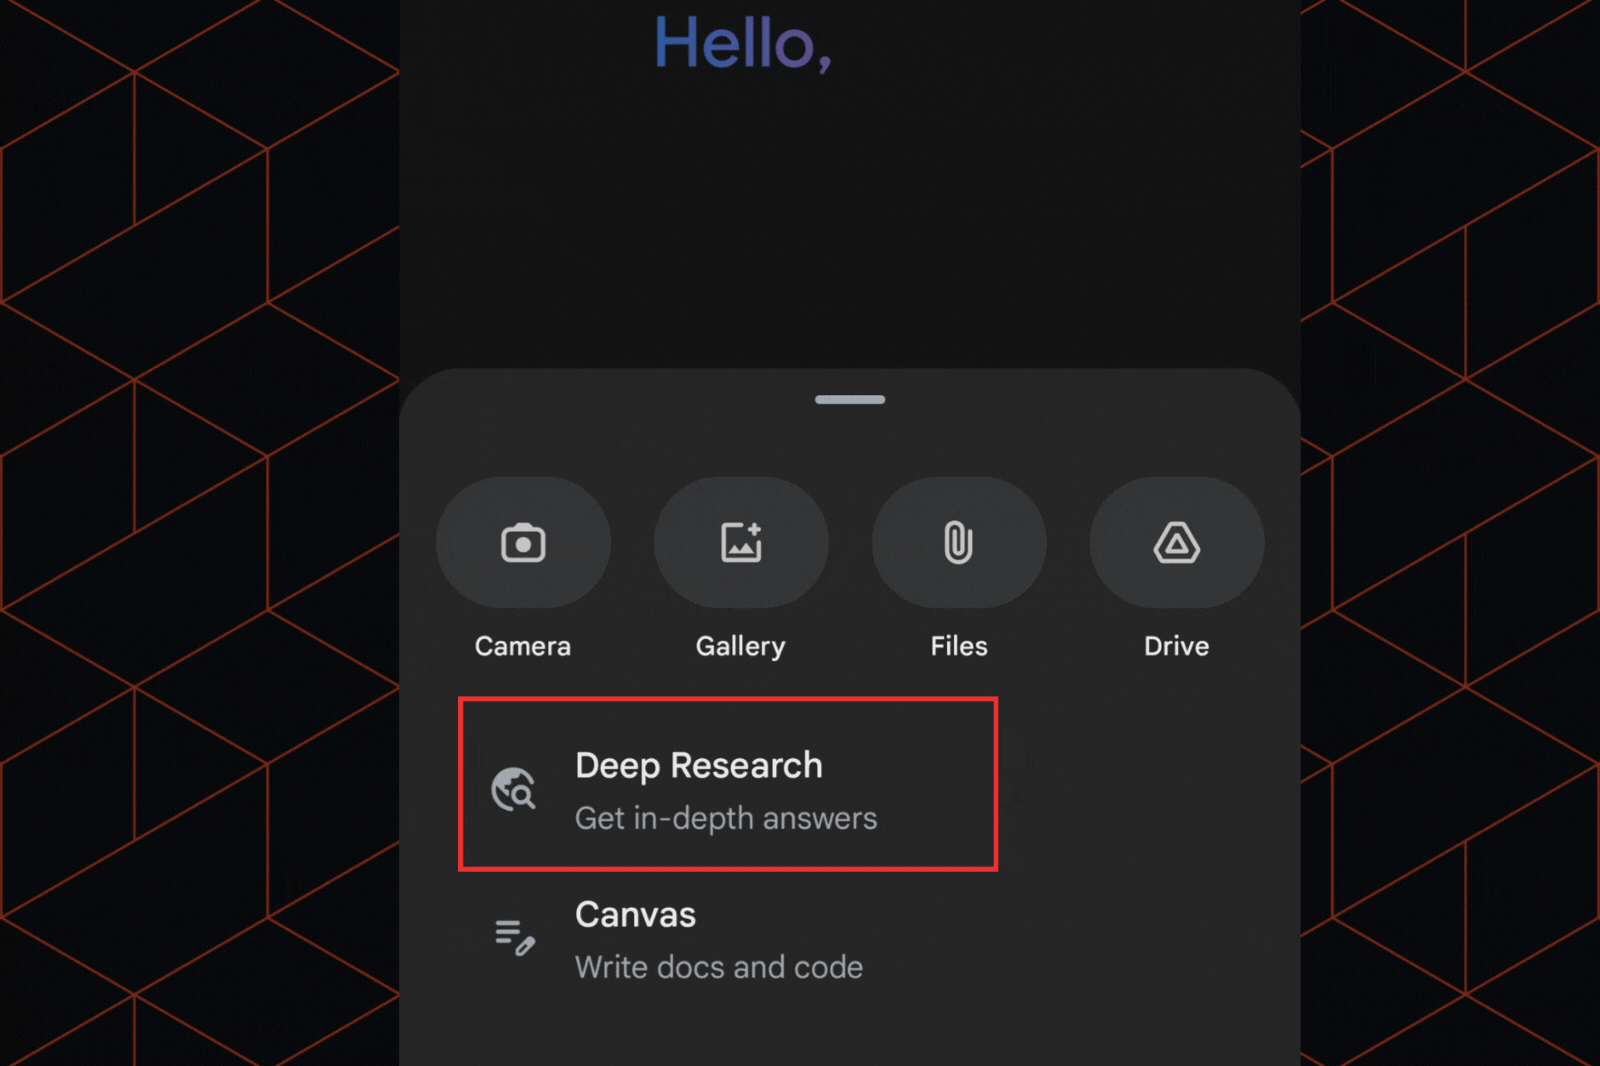
6. Start a Canvas by tapping on (+) if you wish to brainstorm ideas. As compared to the desktop version, this feature can make you feel a little restricted on mobile devices.
How to use Gemini on an iPhone?
1. Download and install the Google Gemini application from the Apple App Store.
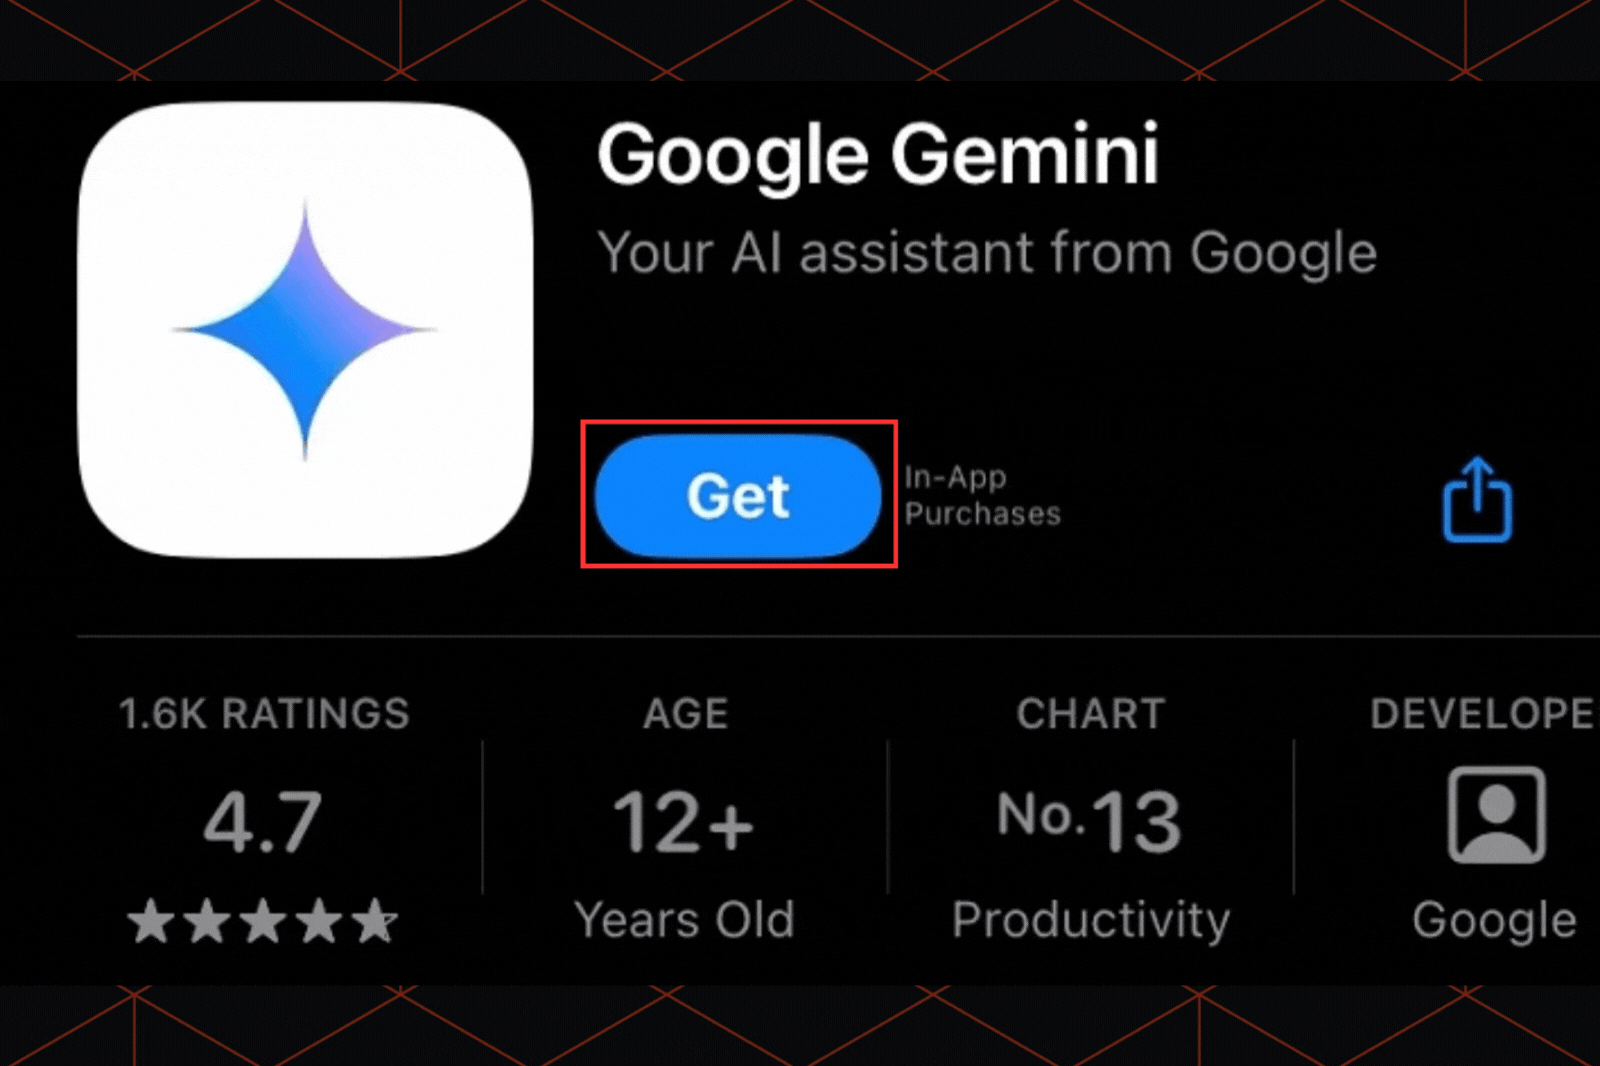
2. Start chatting with it by typing your prompt in the message box or clicking on the mic for voice inputs.

3. Similar to Android, you can take the next steps and start using it effectively.
Note: Unlike Android users, you won’t get the in-depth system-level or Google Assistant integrations.
What is Gemini Live, and how to use it?
After using Gemini Live, I felt like interacting with a real-time multimodal AI assistant that allows for quick screen sharing, camera interactions, and file uploads. Here’s how I used it:
1. Check its compatibility across devices
Before you rely on it, you must know that it is pre-installed and offers full functionality on devices such as Samsung Galaxy S25 and Google Pixel 9 (it will be available on all Android devices soon). If someone in your team has these phones, you can easily access them for free.
Or else, if you have a Gemini Advanced subscription, you can access it on any device. Without a subscription and these specific devices, you can still access it on other devices.
For that, you need to download Google Gemini from the Google Play Store or the Apple App Store. Then, you can access Gemini Live. The free version is nice, but it comes with limited functionality and features.
2. Activate Gemini Live on its application
Once you have installed the Gemini application, you need to open and simply tap the ‘Live’ icon or say ‘Hey Google, open live chat’. This way, you can activate it smoothly.
When you are performing this task, ensure that you are not in crowded areas. It can interrupt the flow of voice commands and may take a little longer to activate. Also, ensure that you have a stable connection to avoid unnecessary lags during times of low bandwidth.
If you are willing to try its free version. Don’t keep too many expectations. Some features like camera interactions and screen sharing are only available on Samsung Galaxy S25 and Google Pixel 9 yet. So, you may not find very happening features like ‘camera mode’ on other devices, unless you have a subscription.
3. Choose the mode of interaction
With Gemini Live, you can easily chat via live video calls, share your screen, or even upload files to discuss work with the AI assistant. As per your needs, you need to choose one mode.
If you want to have a personalized interaction with Gemini and show it a work site or anything around you, ‘Camera Mode’ is the most feasible option. I liked this mode. It really made our job easy to communicate with Gemini without typing. Instead of typing a prompt, we could show our product and ask for easy-to-remember product names. But remember, this is only available in the paid version.
To improve your conversation with Gemini, if you wish to share a file or simply an image with them, you can opt for ‘File Uploads’ mode. This can help you generate accurate responses and even write quick summaries.
For creating a quick outline or MOM of your meetings, you can even share your screen and present your deck or a PPT. For this, a strong data connection and subscription to the Gemini Advanced plan are necessary.
Before you opt for any mode of interaction, ensure that you have a good internet connection so that it performs smoothly, without any hassle.
4. Engage naturally in the conversations
Once you start interacting with Gemini Live using a mode, you need to engage well with it. I remember one of my team members was talking so naturally with it, and it was like magic. It gave real-time answers quickly.
And what about context understanding, tonality, and flow? All was good, as it is specifically designed to adapt different tones, understand context properly, and even provide thoughtful and meaningful answers.
Like ChatGPT, even Gemini Live has a voice feature. You can easily engage with it–ask questions and get quick responses smoothly.
But it’s not perfect yet. Delays may occur, especially during peak times or when there is a fluctuation in the internet speeds.
5. Manage sessions properly
Once you get the desired response from the live interaction with the Gemini Live, you can simply end the session by clicking the ‘End’ button or saying ‘Stop’.
If you wish to revisit the previous live interaction, you can review the history in the application. Or if you want to start a new interaction on a fresh topic, you can tap the ‘Live icon’ or simply give a voice command. This will again be a live conversation.
To adjust the chat history and manage it effectively, you need to manually make changes in the settings. Unlike ChatGPT, it does not automatically save the chat. You need to specify your preferences (save or delete your chat history), and then it will take the next step. This way it protects your privacy.
In which tasks does Google Gemini excel?
After testing and trying different tasks for over a month, I found that Google Gemini can be paired perfectly with some of them. Let me share it with you.
1. Data analysis and summarization from Google Workspace
Google Gemini works great when it comes to writing a summary of a large chunk of data, especially when the source is Google Docs or Sheets. Here’s why: While testing, I randomly pasted the link to my Google Docs (the research report was too long) and asked it to summarize it. And it actually turned out good. The information was widely accurate.
The best part was when it perfectly pulled out action items and main points. Our struggle to manually scan documents came to an end. But yes, for some complex documents, I had to intervene in between and ask for refinements.
Overall, it worked beautifully for generating quick summaries.
2. Writing posts, emails, and basic content
Like me, if you are someone who often feels exhausted from writing long emails and social media posts at the same time, Google Gemini can ease your job. To start off, I used it to create drafts for client emails and even LinkedIn posts.
We used a clear, detailed prompt and asked Gemini to write strong and professional content as per the target audience. Within seconds, it generated content that was great.
Of course, you can’t blindly copy-paste the first draft. I added a personal touch and refined it as per the brand voice. This whole thing saved us a lot of time and energy.
3. Brainstorming new ideas
After attending client meetings and multitasking, my team often feels stuck when it comes to being creative. To give them a boost, I told him to include Google Gemini in their brainstorming sessions. They tried looking for content topics, storyline for marketing campaigns, and also product names.
I personally asked 10 blog title options for a video series for different brands. To my surprise, it was pretty creative and gave suggestions as per my brand brief and guidelines.
Obviously, not every idea was actionable and relevant as per the current lifecycle of our products, but yes, it gave us a strong start. Thereafter, it was easy for my team to work around it and make it more engaging.
4. Generating AI images
I really liked its AI image generation feature. For Instagram posts, blog covers, and even some presentations, it was fantastic! Not exaggerating, but it processed way faster than ChatGPT (free version) and was more seamless.
I just described what I want in detail, such as ‘minimalist sofa design’ or a ‘futuristic landscape’, and Gemini stood out in generating clear and polished images that fit properly in our work.
But it struggled at times when generating a highly detailed image, and quality was not always consistent. So, we had to refine it with prompts or ask our graphic designer to give a final touch and add intricate details.
If you see it as a help tool, it is nice. But you can’t solely rely on it for image creation.
Tips for writing results-driven prompts in Google Gemini
After testing and playing with different prompts, here’s what helped me drive results.
- Be specific and detailed in your instructions :
Google Gemini responded in a better way when I gave clear and specific instructions. At first, I asked broad questions such as ‘What are the best AI tools in 2026?’. In response to it, Gemini responded with general and monotonous answers.
After continuously refining the prompt, I tried being clearer and specific. I wrote ‘What are the top 5 AI tools for video editing in 2026?’. This prompt gave me well-focused and accurate answers.
- Write your prompt step-by-step :
When you need assistance to complete a complex task, Gemini’s response can be quite disorganized and slightly overwhelming. For instance, I wanted to create an in-depth marketing strategy. So, I broke down the response into small steps.
First, I asked for a simple outline ‘Can you give me an outline for a marketing strategy for X brand that targets Gen Z. This gave me a clear and well-structured response. Then, I carefully asked it to expand on each point and thus improved the flow of the response.
- Fine-tune the response using the follow-up questions :
One of the best abilities of Google Gemini is to continuously refine the responses with the help of follow-up questions. So after it generated a draft for a blog on a particular topic, I tried asking ‘Can you make this more engaging and persuasive?’.
The revised draft was more polished and far better than the original one. Thus, the learning is it can create better content quickly before you start looking for other AI tools.
To sum it up, if you need a better structure, flow, and specific areas to be covered in a response given by Google Gemini, you need to be specific, clear, and make your prompt more actionable.
How to automate Google Gemini with Boltic?
As I always preferred Boltic.io to automate my workflow, I tried integrating Google Gemini with it, and the experience was amazing. Here are some of the steps I performed:
Step 1 - sign up to access
If you are a new user, you need to sign up and create a fresh account at Boltic.io and simply log in to your dashboard.
Step 2 - Get your Gemini API key
To quickly integrate it with Boltic, get your API key from Google Gemini.
Step 3 - Create a fresh Workflow
Create a new workflow within Boltic.io and explore its features.
Step 4 - Add an action node for Google Gemini
In your workflow, add Gemini as an action node.
Step 5 - Set up a configuration for the Gemini node
Add your Gemini API key and set proper parameters to use it.
Step 6 - Link triggers and other actions
Connect Google Gemini with triggers like receiving a message and related actions like sending a message.
Step 7 - Run tests and deploy your workflow
To ensure smooth functioning, run several tests and finally deploy your automation workflow.
drives valuable insights
Organize your big data operations with a free forever plan
An agentic platform revolutionizing workflow management and automation through AI-driven solutions. It enables seamless tool integration, real-time decision-making, and enhanced productivity
Here’s what we do in the meeting:
- Experience Boltic's features firsthand.
- Learn how to automate your data workflows.
- Get answers to your specific questions.


